Back to Blog
How to Embed a Calendar on Your Framer Website
Written by
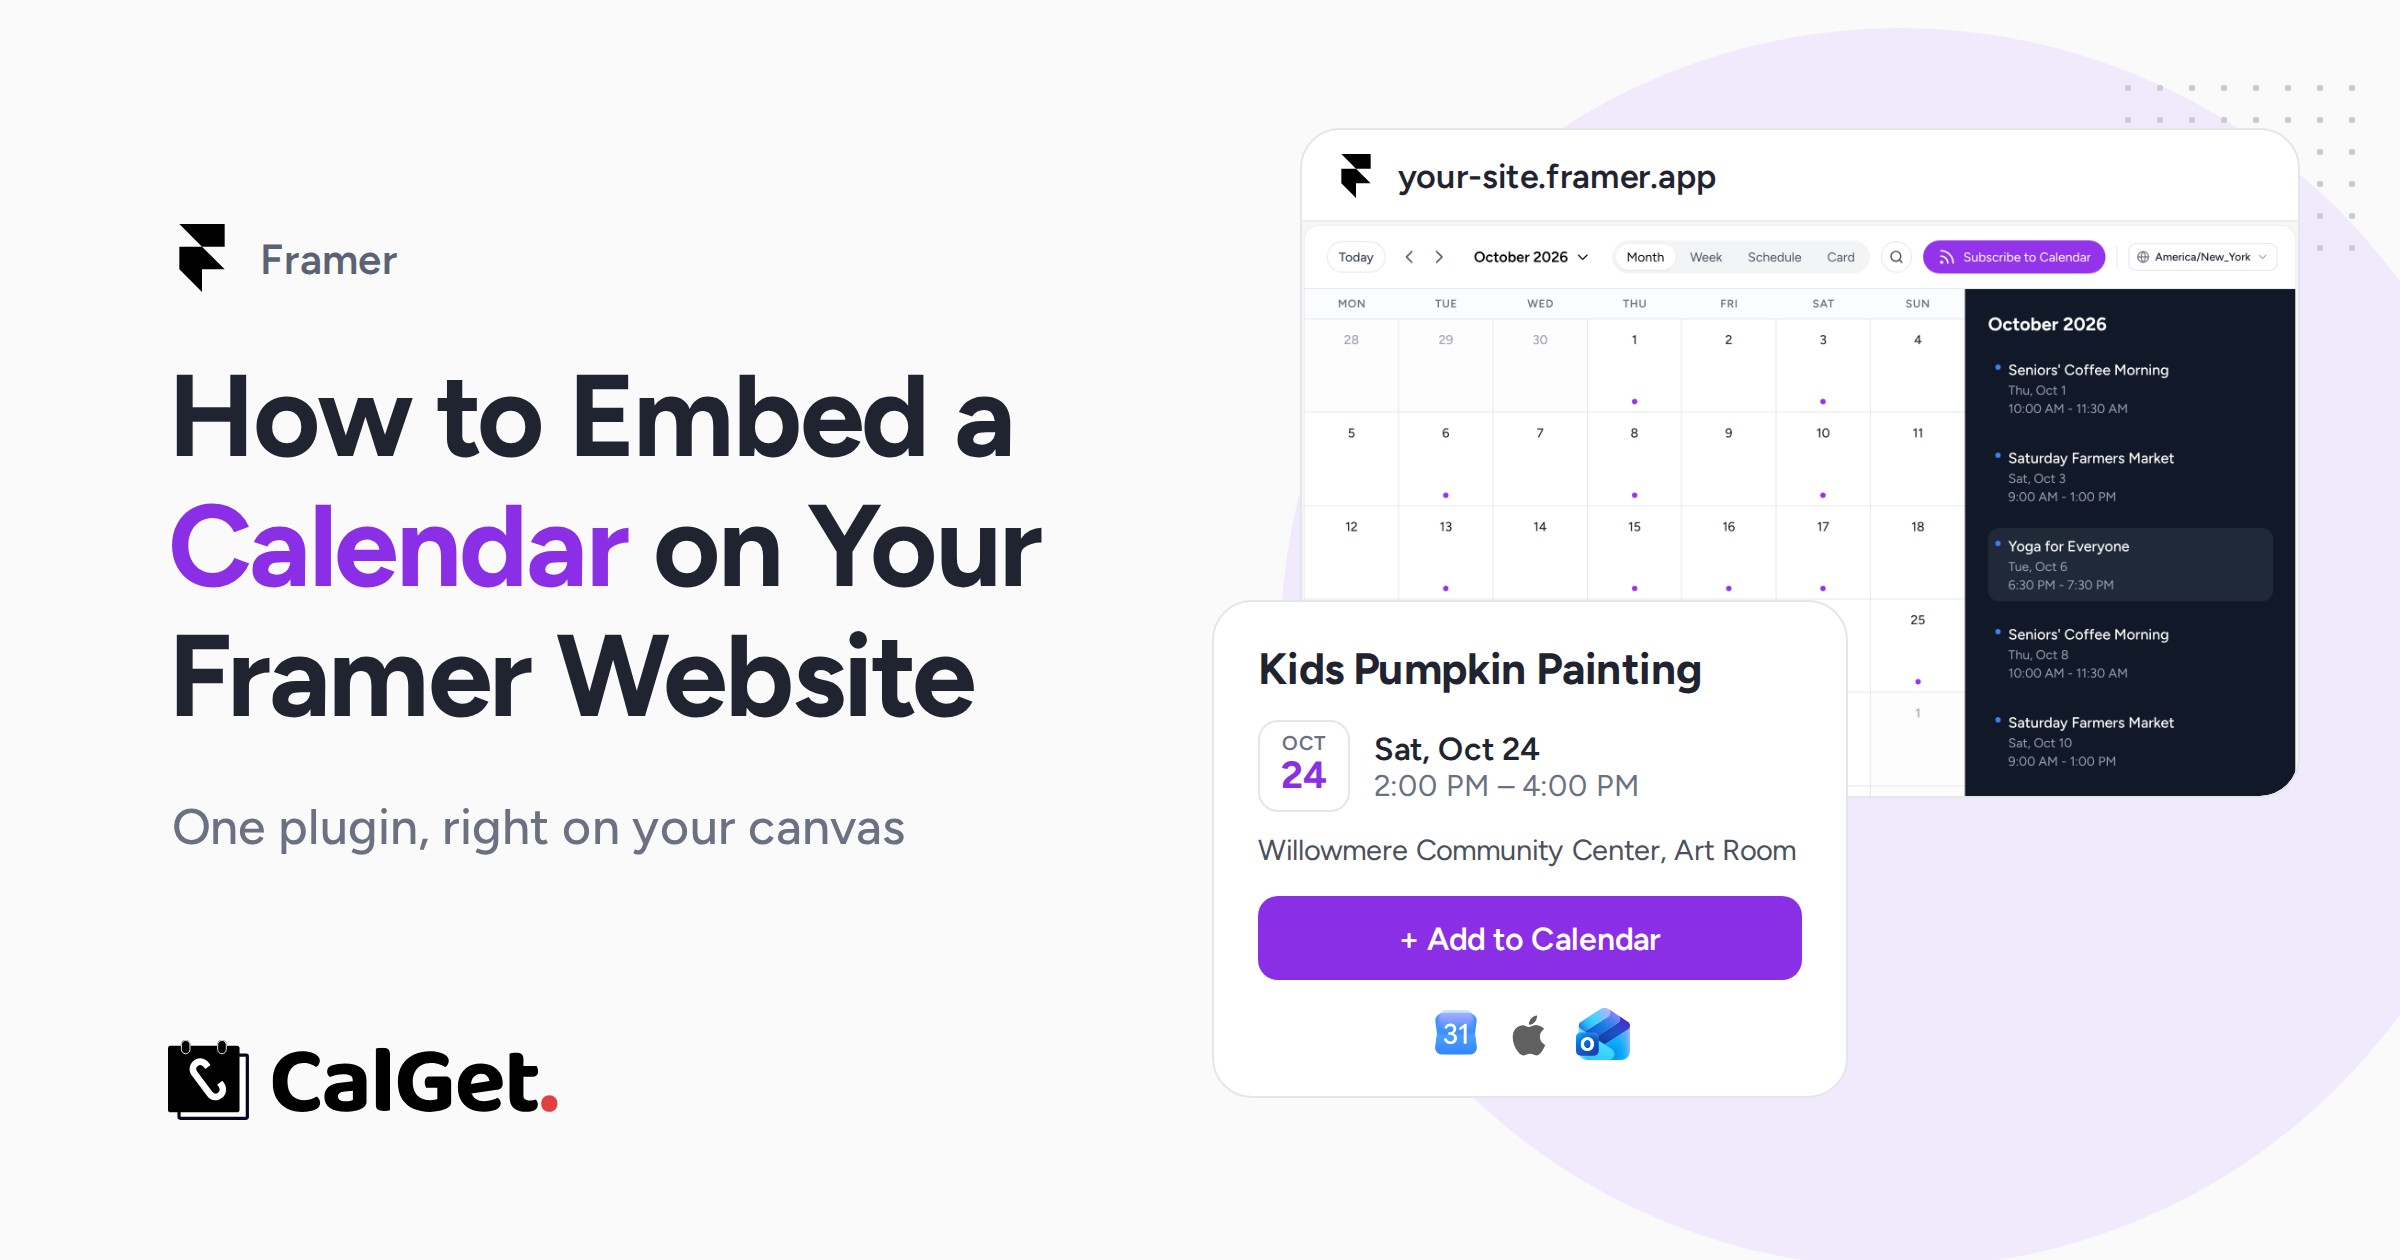
Last updated: October 2026. We rebuilt this guide around the Event Calendar - CalGet plugin for Framer. Every step below comes from a real Framer project and a real CalGet account, and we checked the Framer side against Framer's help pages.
Quick answer
To embed a calendar on your Framer website, use the Event Calendar - CalGet plugin. No code to paste, and it takes about 10 minutes:
- In Framer, open Plugins, search CalGet and open Event Calendar - CalGet.
- Copy your API key from CalGet's Team Management page, paste it in the plugin's Account tab and click Connect to CalGet.
- Pick your calendar and click Insert Event Calendar. Drag it into your page and size it.
- Choose the view, your accent color and light or dark mode, then Publish.
- If the live site says "Access Restricted", add your site's address in CalGet under Embeddable Calendar → Domains.
Framer has no built-in events calendar. For a long time the answer was to copy embed code from somewhere else, drop it into an Embed component and nudge the box until it fit. It works, but every change to the color or the view means copying new code and pasting it again.
There's an easier way now. The Event Calendar - CalGet plugin puts a real events calendar straight onto your Framer canvas, as a calendar component you can drag, resize and restyle like anything else on the page. This guide walks through the whole setup on a real site, the BuildWithAI Summit demo, from opening the plugin to the calendar going live.
Create your CalGet calendarGet the Framer plugin
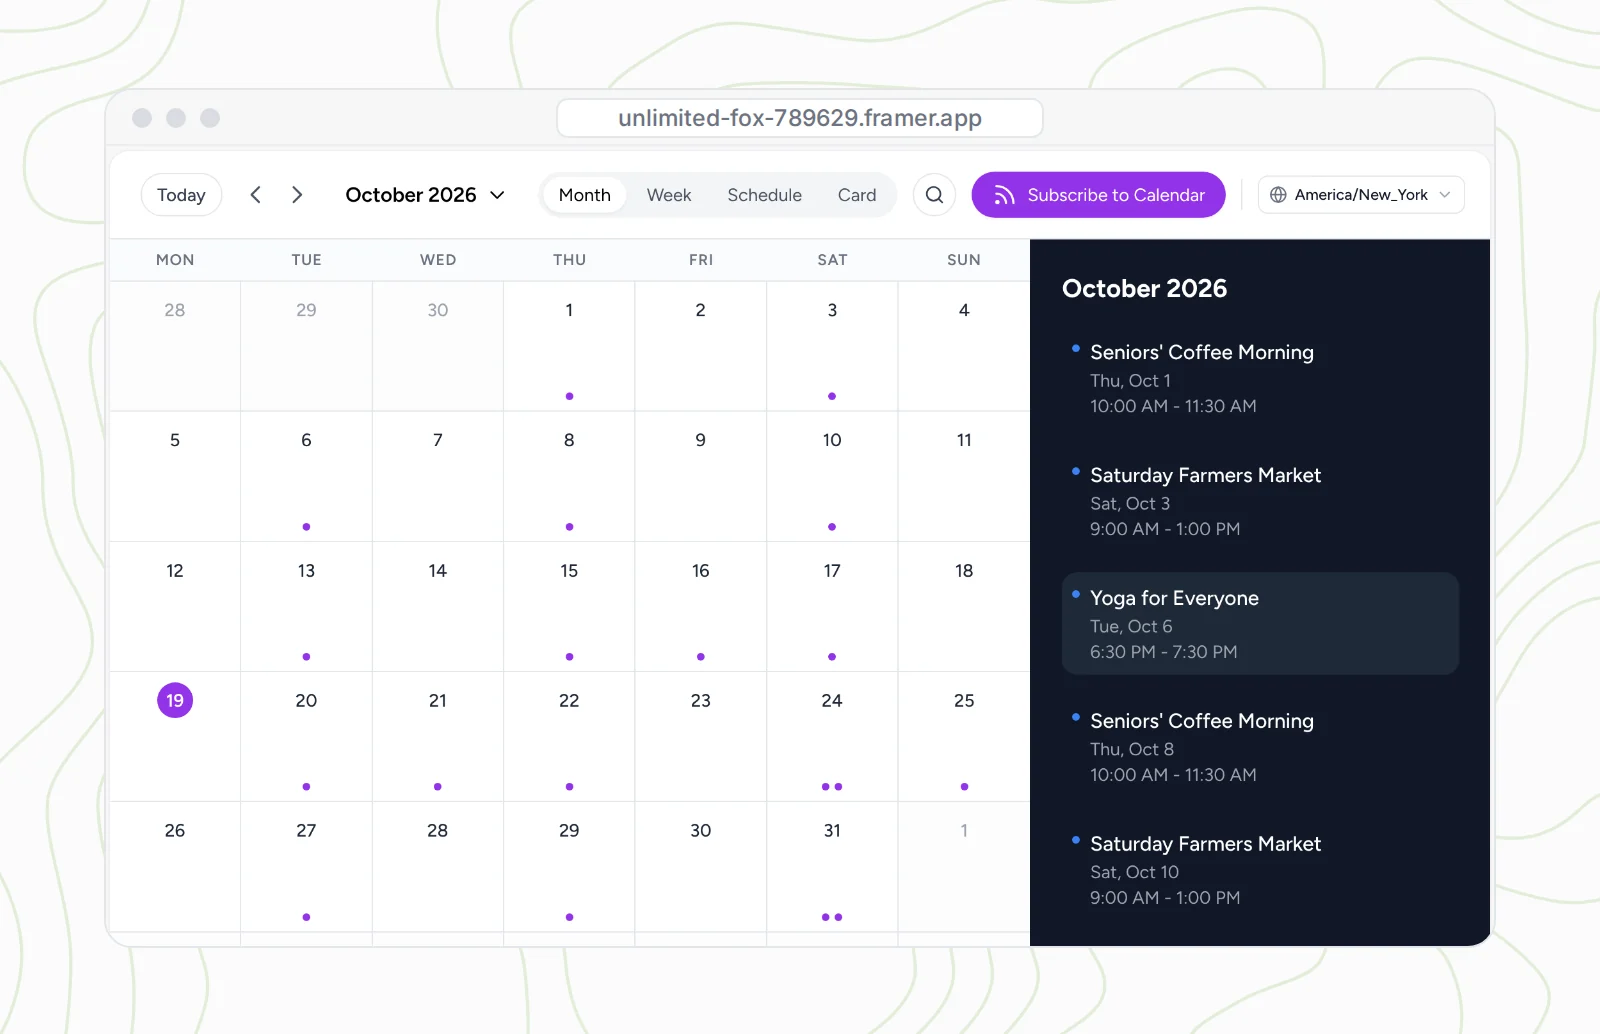
What the Framer calendar plugin adds to your site
The plugin inserts a CalGet calendar as a Framer component. Your events stay in CalGet, so the calendar on your site updates on its own when you add or change an event. On the canvas you control:
- Four views: Month, Week, Schedule and Card.
- Light, Dark or Auto mode, and an accent color that matches your brand.
- Monthly view layout: a single column, or a side panel that lists the month's events in full.
- Language, first day of the week and time zone (it can follow each visitor's time zone).
- The top bar: show or hide the date, the view switcher, search, Subscribe and the time zone picker, or hide the bar entirely.
- Accept guest events, so people can send you events to approve.
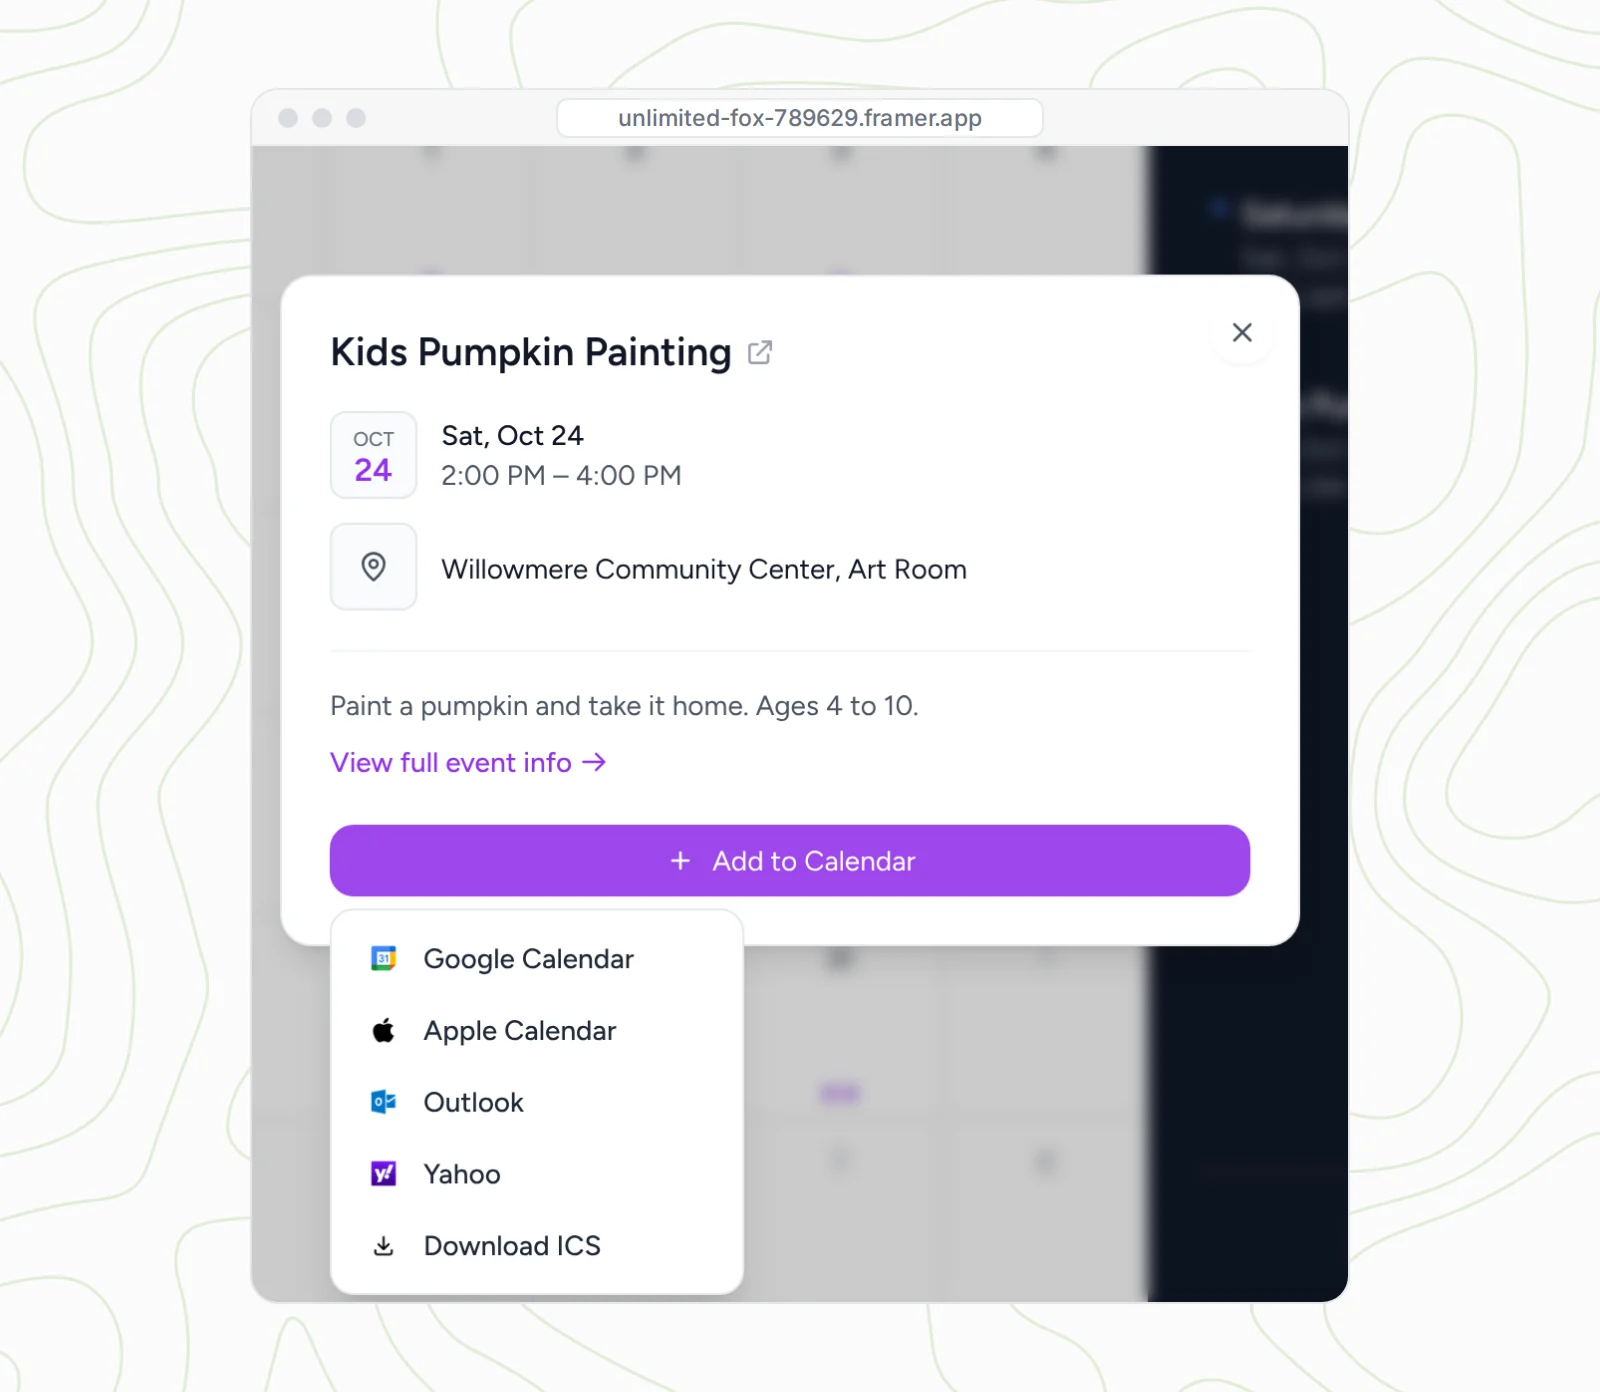
Visitors can click any event and save it to Google Calendar, Apple Calendar, Outlook or Yahoo, search every event, or subscribe once so new events show up in their own calendar.
Framer calendar plugin vs pasting embed code
| Event Calendar - CalGet plugin | Embed code in an Embed component | |
|---|---|---|
| Setup | Connect once, pick a calendar from a list | Copy code from another tab, paste it in |
| Styling | On the canvas, and changes show live | Outside Framer, then copy and paste new code |
| Change the view or color later | In the plugin or the component's properties | Redo the code |
| Size and position | Like any Framer layer | Like any Framer layer |
| New events | Show up on their own | Show up on their own |
Both load your events from CalGet, so both stay current. The difference is how much back and forth it takes to get the calendar looking right. With the plugin, you never leave Framer for the styling.
How to embed a calendar on your Framer website, step by step
You'll need a Framer project you can edit and a CalGet account with at least one calendar and a few events. Plan on about ten minutes.
Step 1: Open the Event Calendar - CalGet plugin
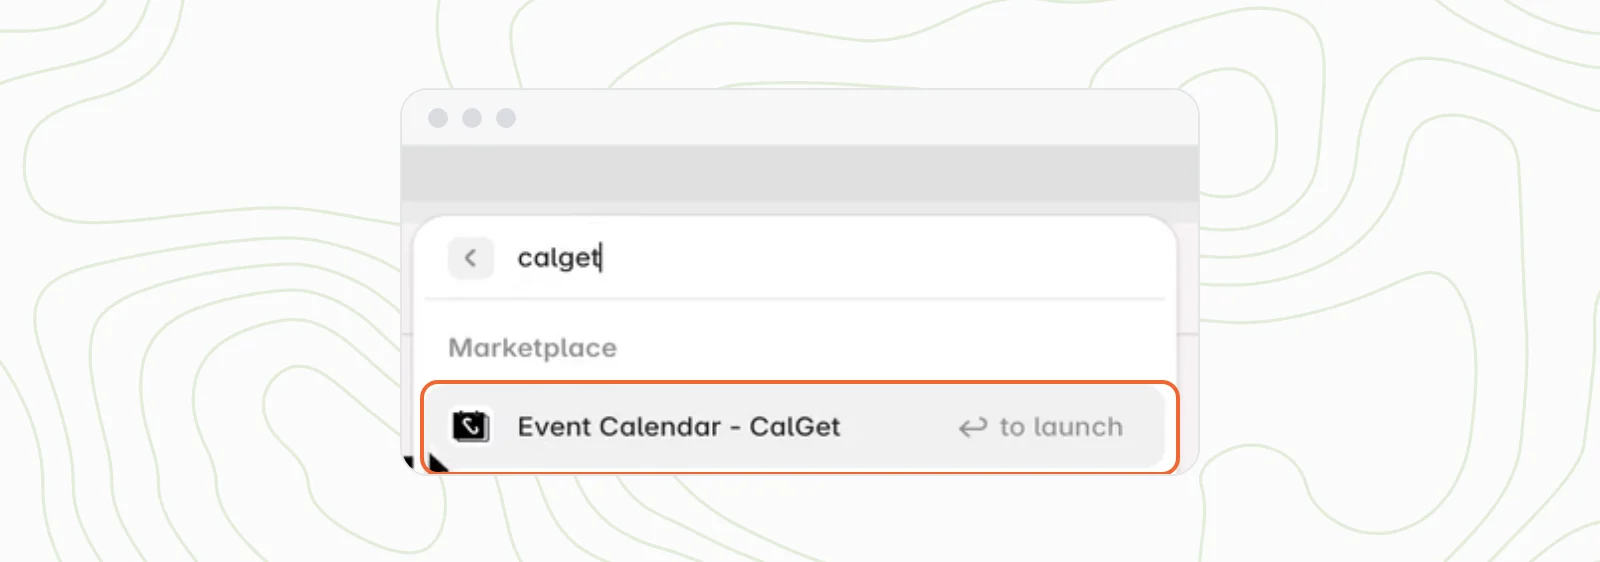
In the Framer editor, open the main menu, go to Plugins and search for CalGet. You can also press Cmd+K (Ctrl+K on Windows) to open Quick Actions and search from there. Pick Event Calendar - CalGet. Framer plugins don't need installing: they open right away, as Framer's help page on using plugins explains.
Step 2: Connect your CalGet account
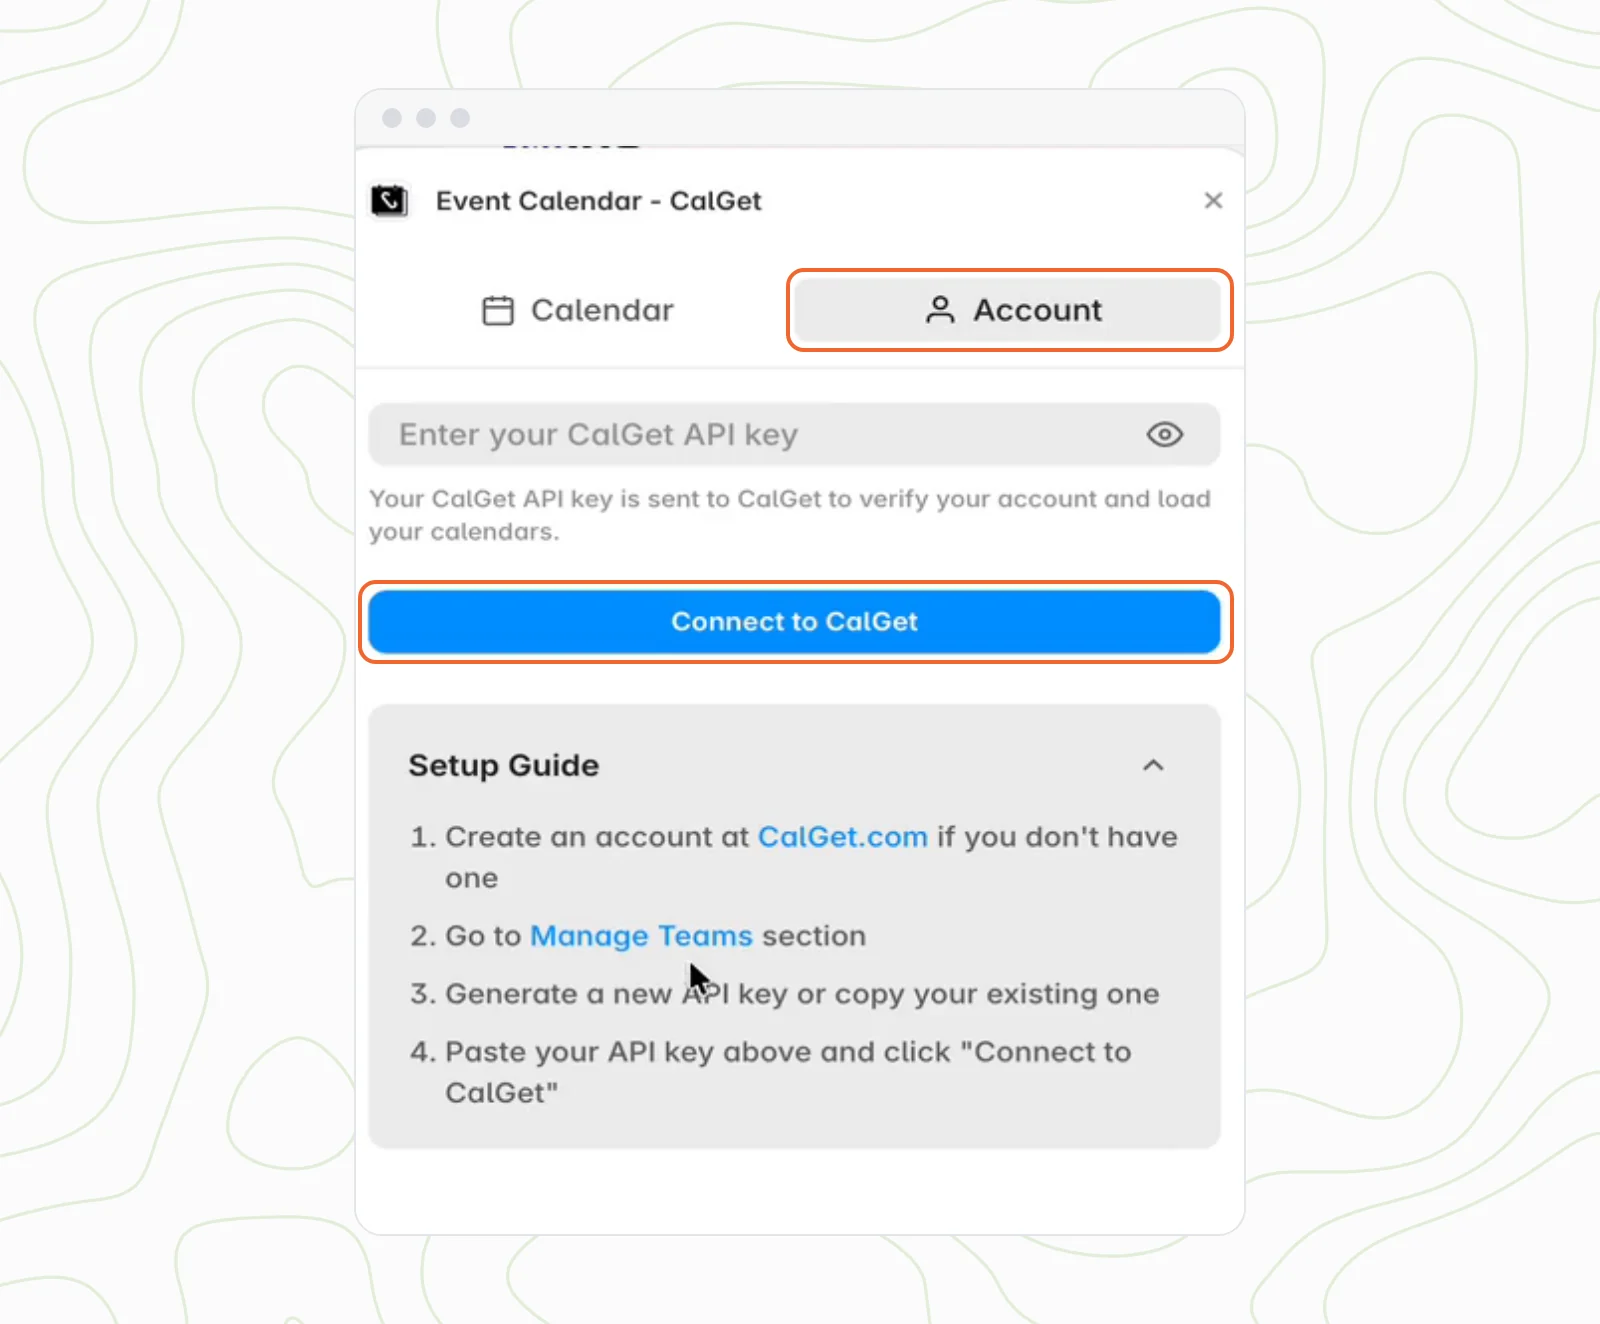
The plugin opens on a Connect screen with two choices: Connect API Key, or Try a sample calendar if you want to see it first. To show your own events, open the Account tab. The Setup Guide there lists where your key is.
No CalGet account yet? Create one, add a calendar and a few events, then come back to this step.
In CalGet, open Team Management. Your team's API key is under the team name, with a copy button next to it. Copy it.
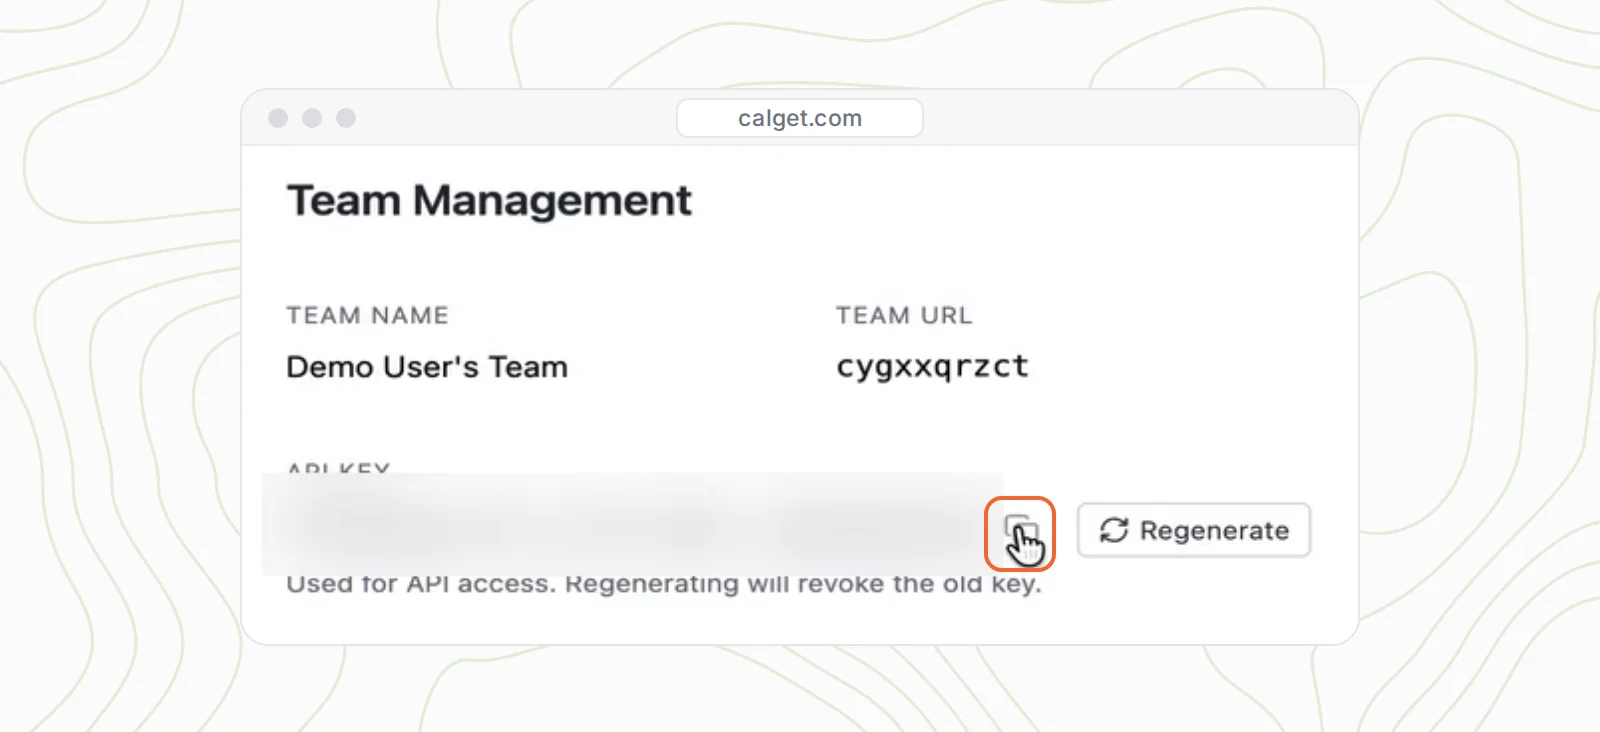
Treat the key like a password: it gives access to your team's calendars. If it ever ends up somewhere public, click Regenerate. As the page notes, that revokes the old key, so you'll paste the new one into the plugin again.
Back in Framer, paste the key into the Account tab and click Connect to CalGet. The plugin switches to the Calendar tab.
Step 3: Pick your calendar and insert it
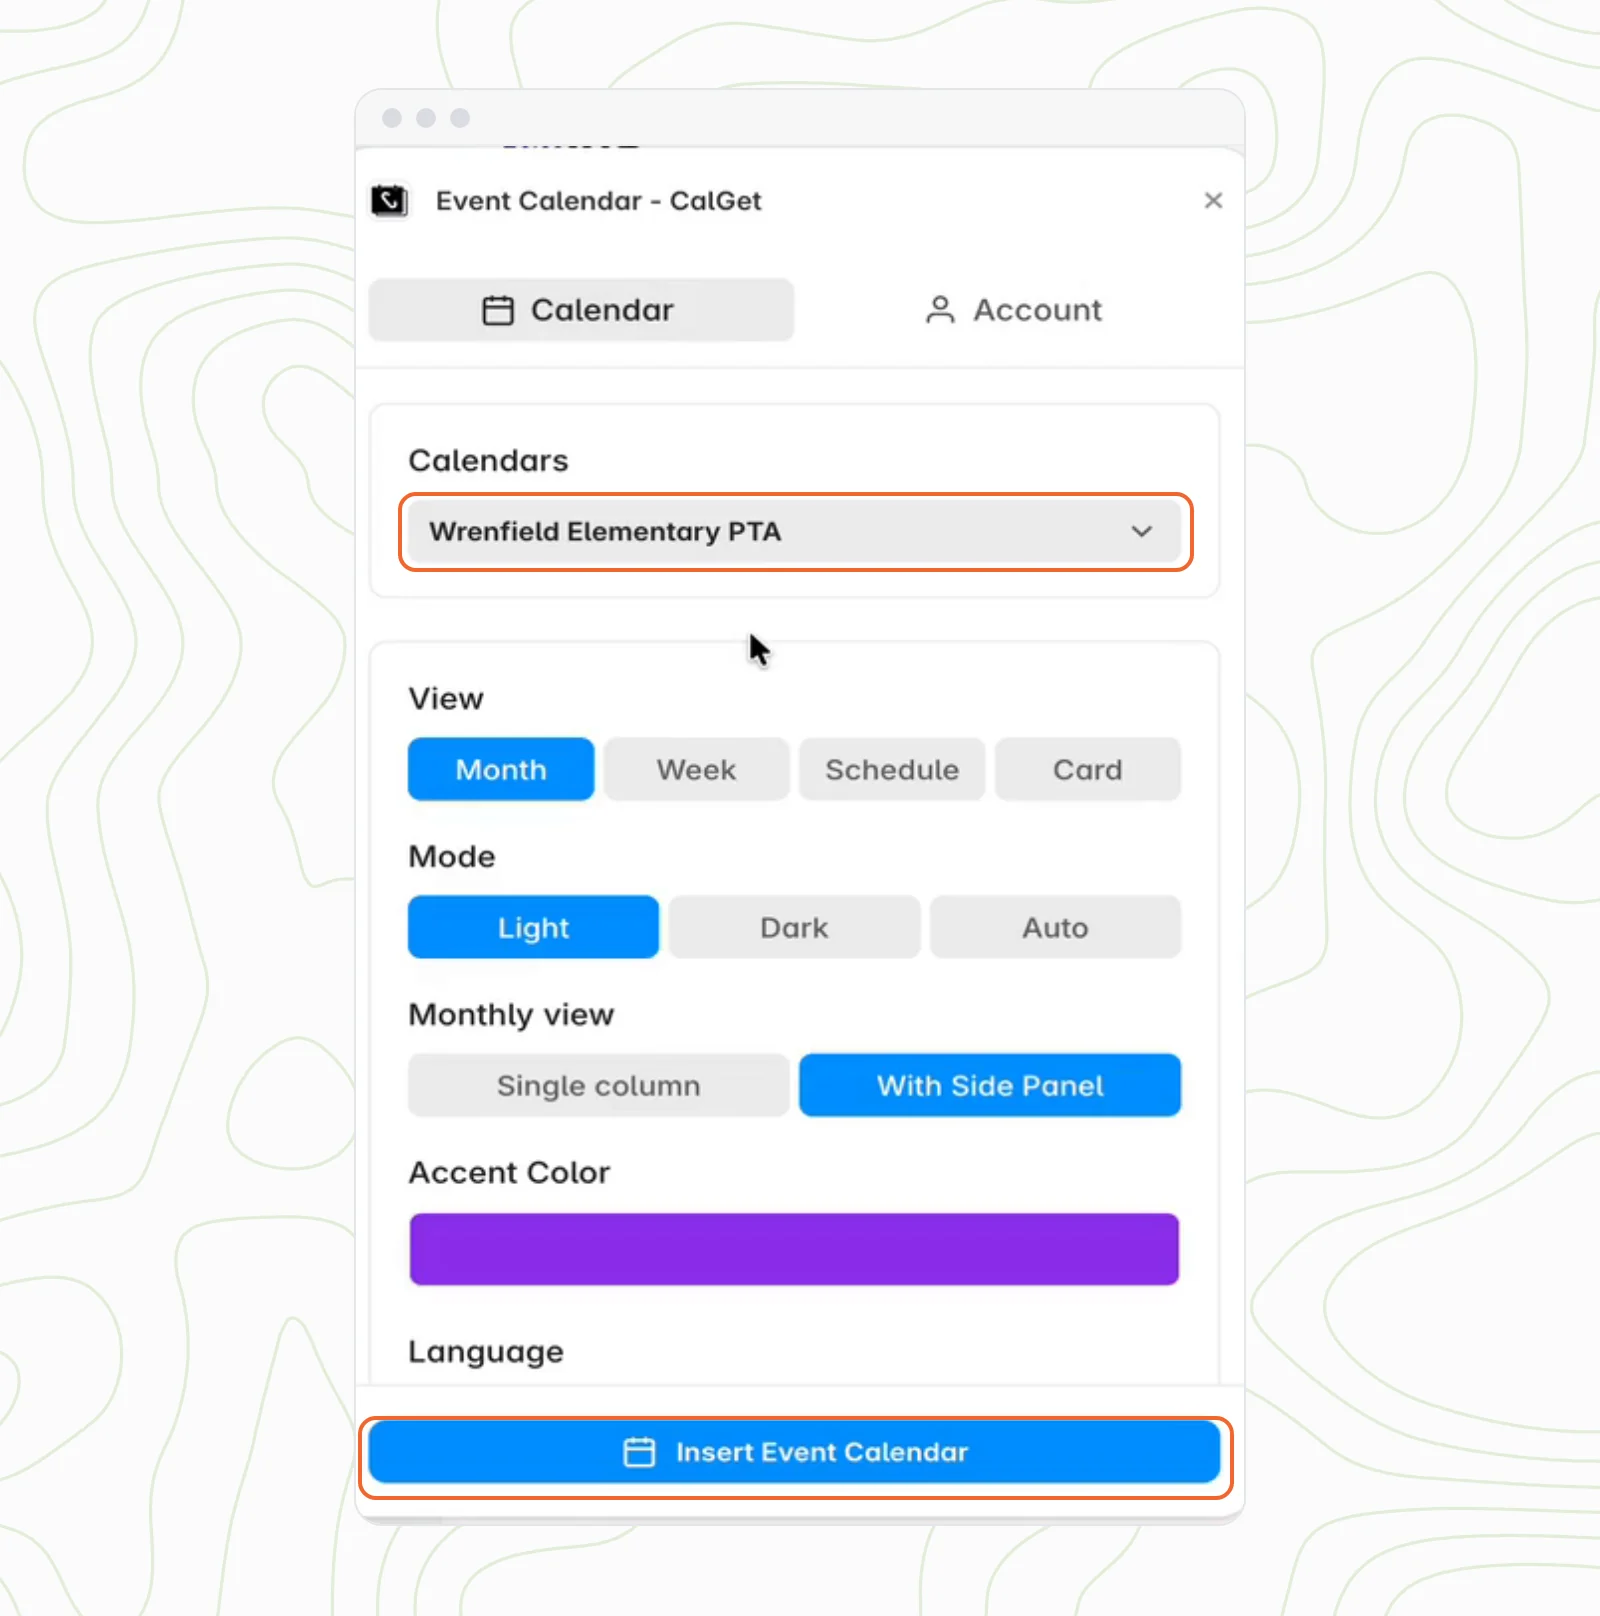
The Calendar tab holds every option, top to bottom: the calendar, the view, the mode, the monthly layout, the accent color, then language, week start, time zone, guest events and the visible elements. You can set them now or after the calendar is on your page.
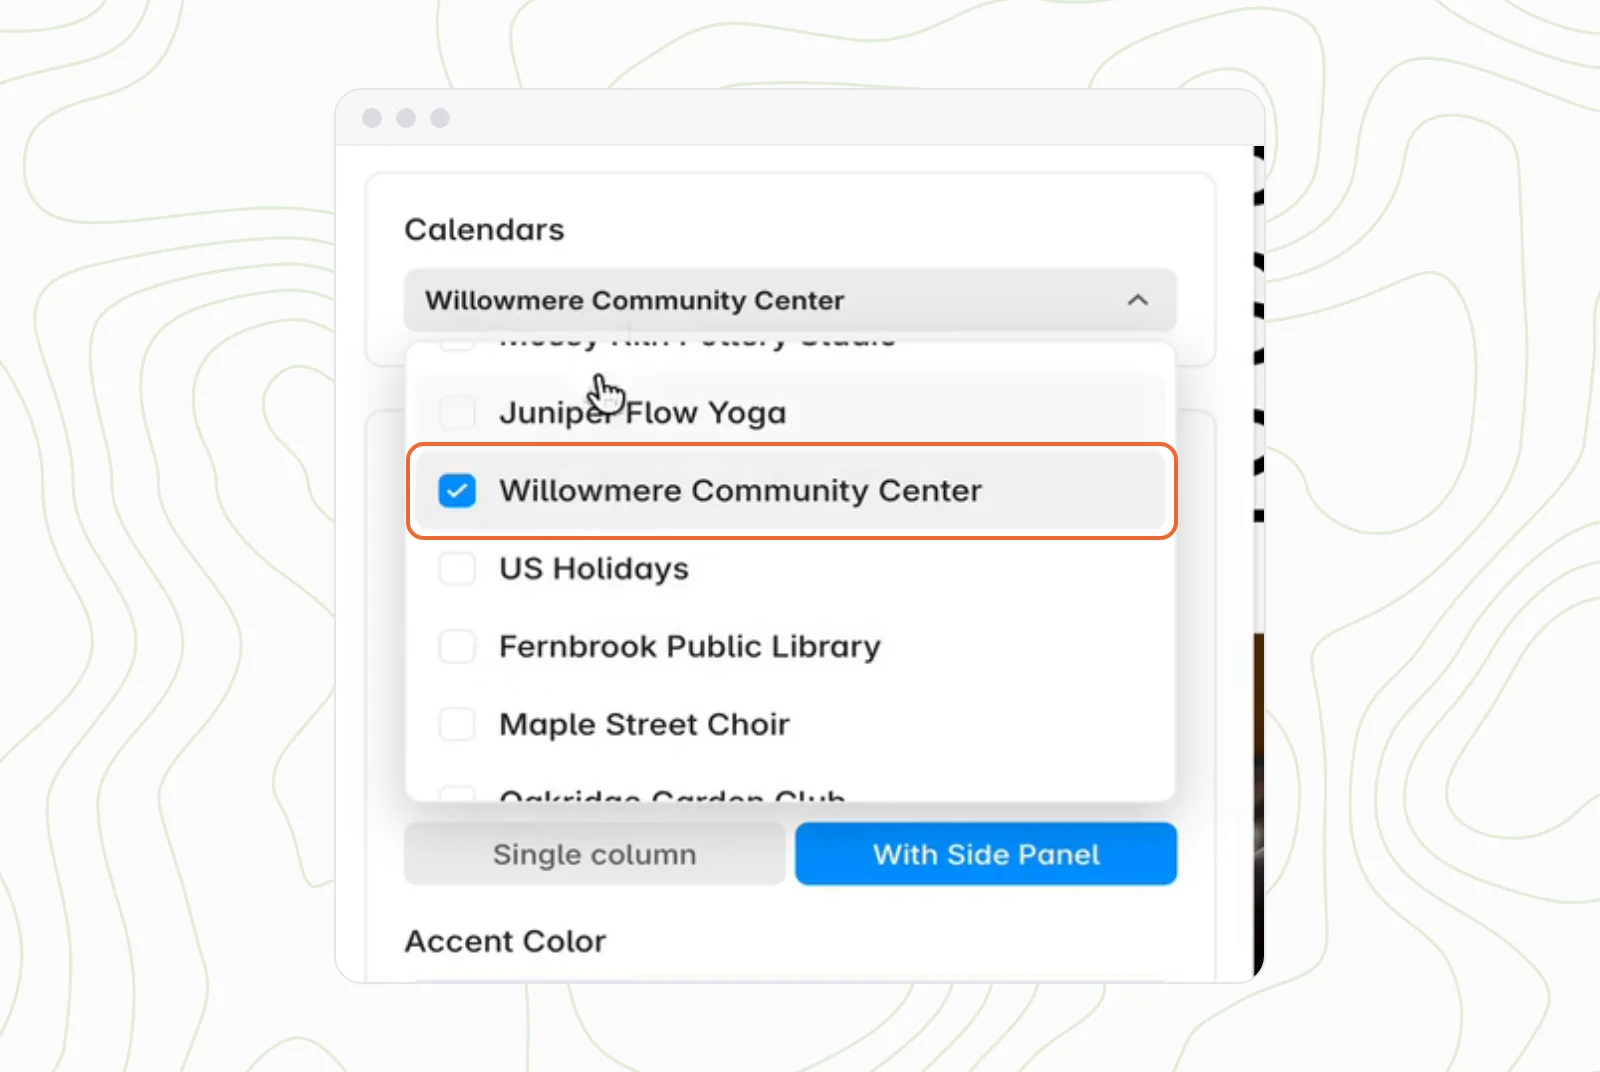
Open the Calendars dropdown and tick the calendar you want to show. Every calendar in your CalGet team is listed. We picked Willowmere Community Center.
Then click Insert Event Calendar. The calendar lands on your canvas with your events already in it.
Step 4: Place it and size it
Drag the calendar into your page, into the section where you want it, and set its width and height like any other layer. Ours is 1080 wide. With the month view and side panel, we made it a little taller, 714, so the last week of the month isn't cut off.
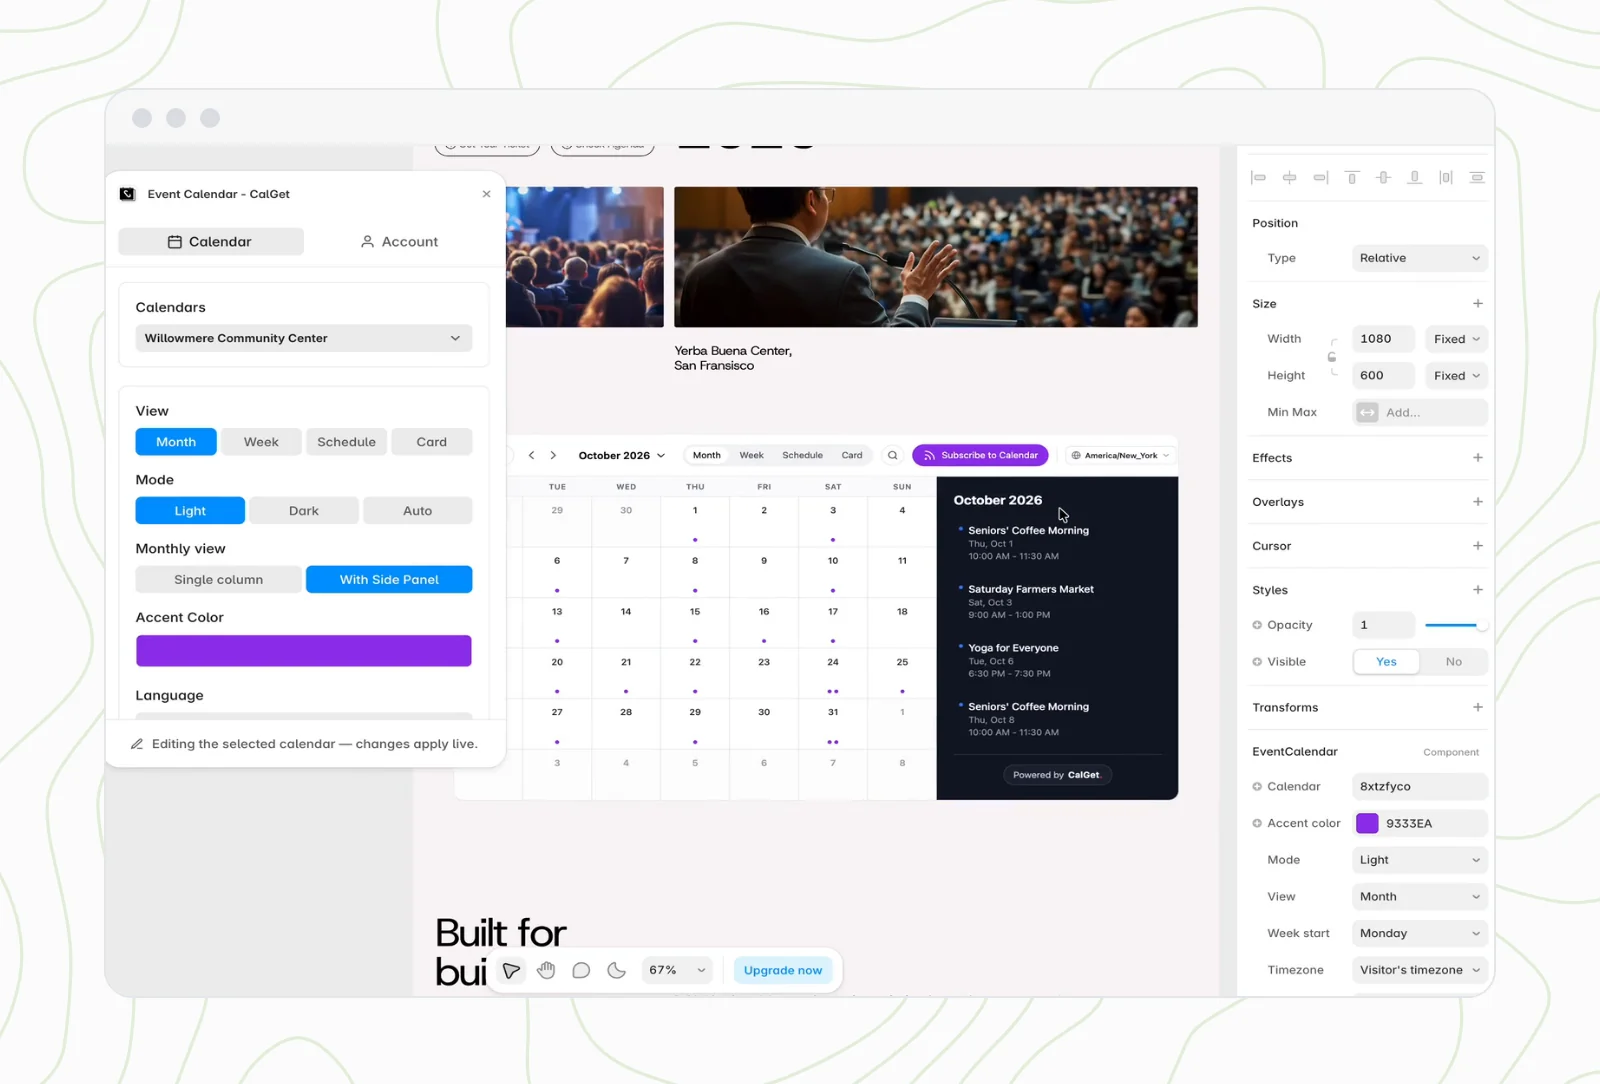
Select the calendar and look at the right panel: the EventCalendar properties repeat the main settings (calendar, accent color, mode, view, week start, time zone and language). That's handy when you only want to switch the view without reopening the plugin.
Step 5: Make it look like your site
With the calendar selected, every change you make in the plugin applies live, so you see the result on the canvas as you click.
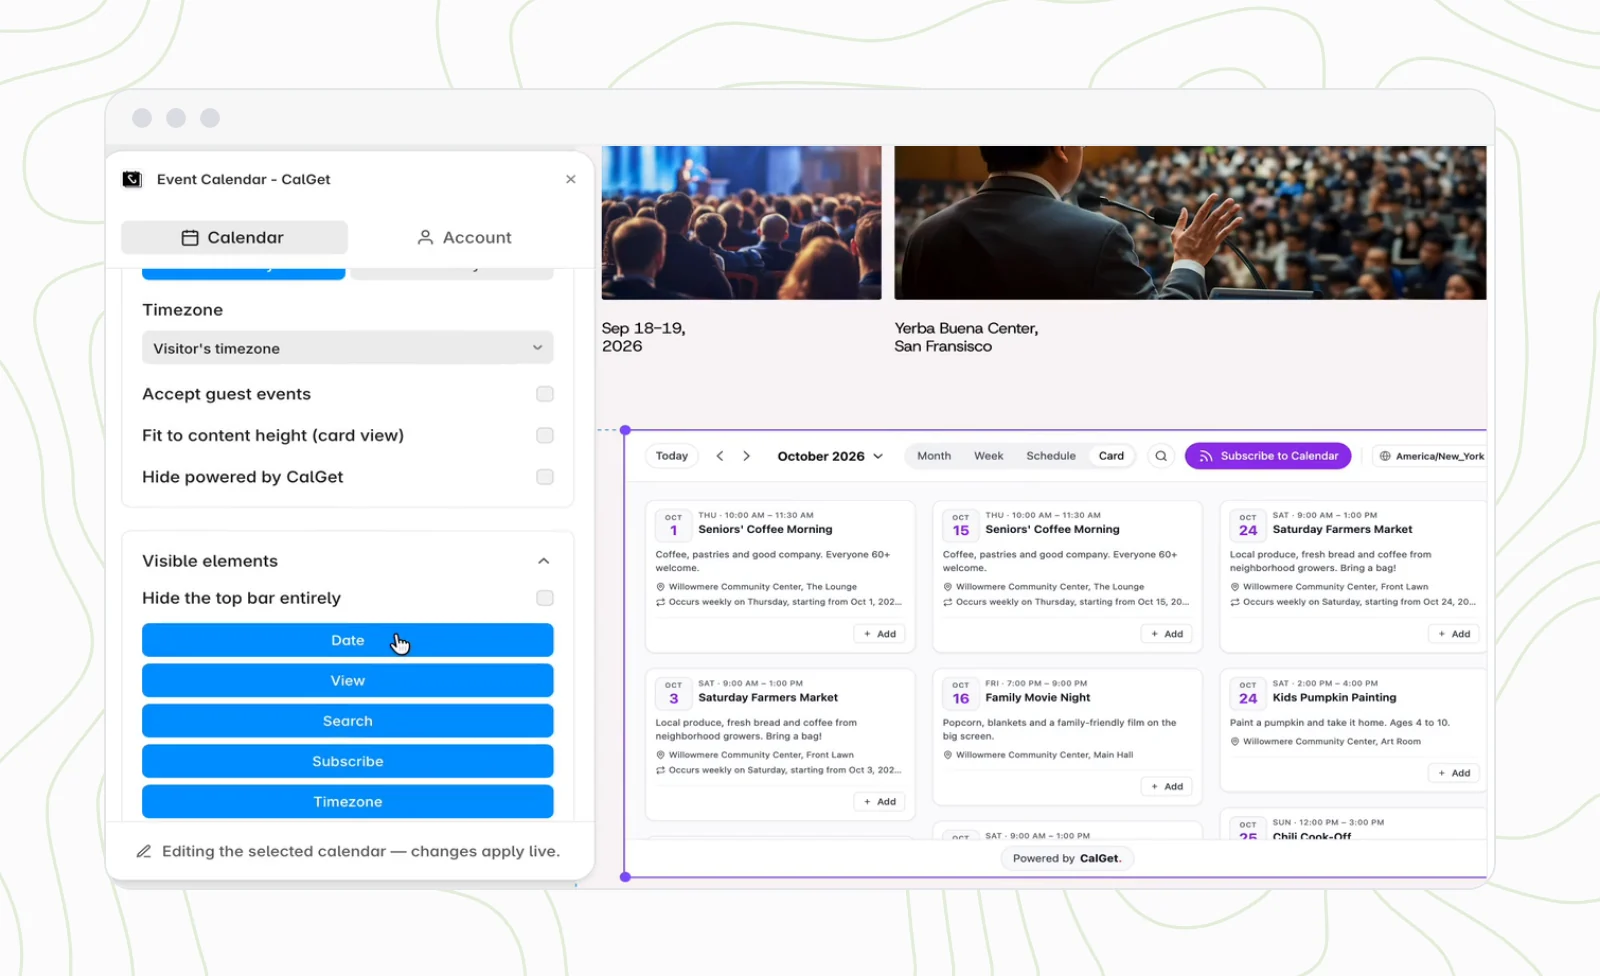
- View: Month suits most event pages. Week and Schedule work for busy weeks. Card turns each event into a card with its own Add button.
- Visible elements: choose what shows in the top bar (date, view switcher, search, Subscribe, time zone), or tick Hide the top bar entirely for a clean card grid.
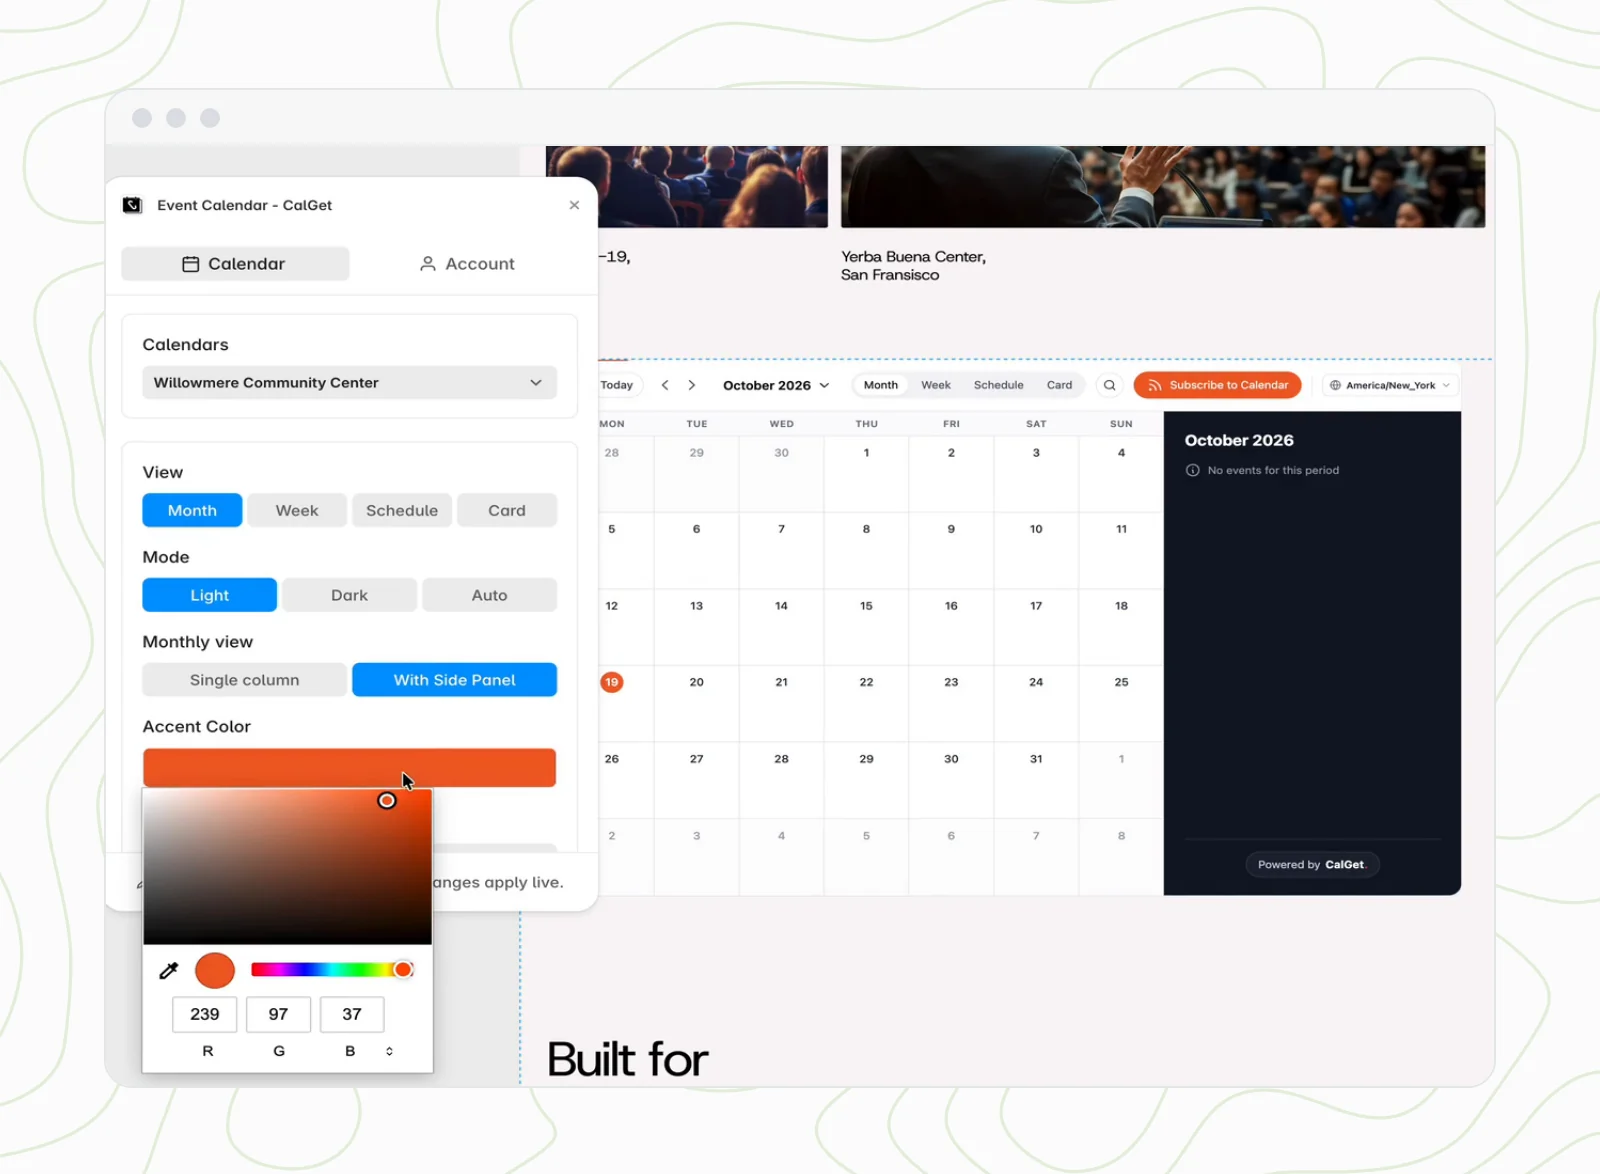
- Accent color: click the color bar and set your brand color. We used EF6125, an orange.
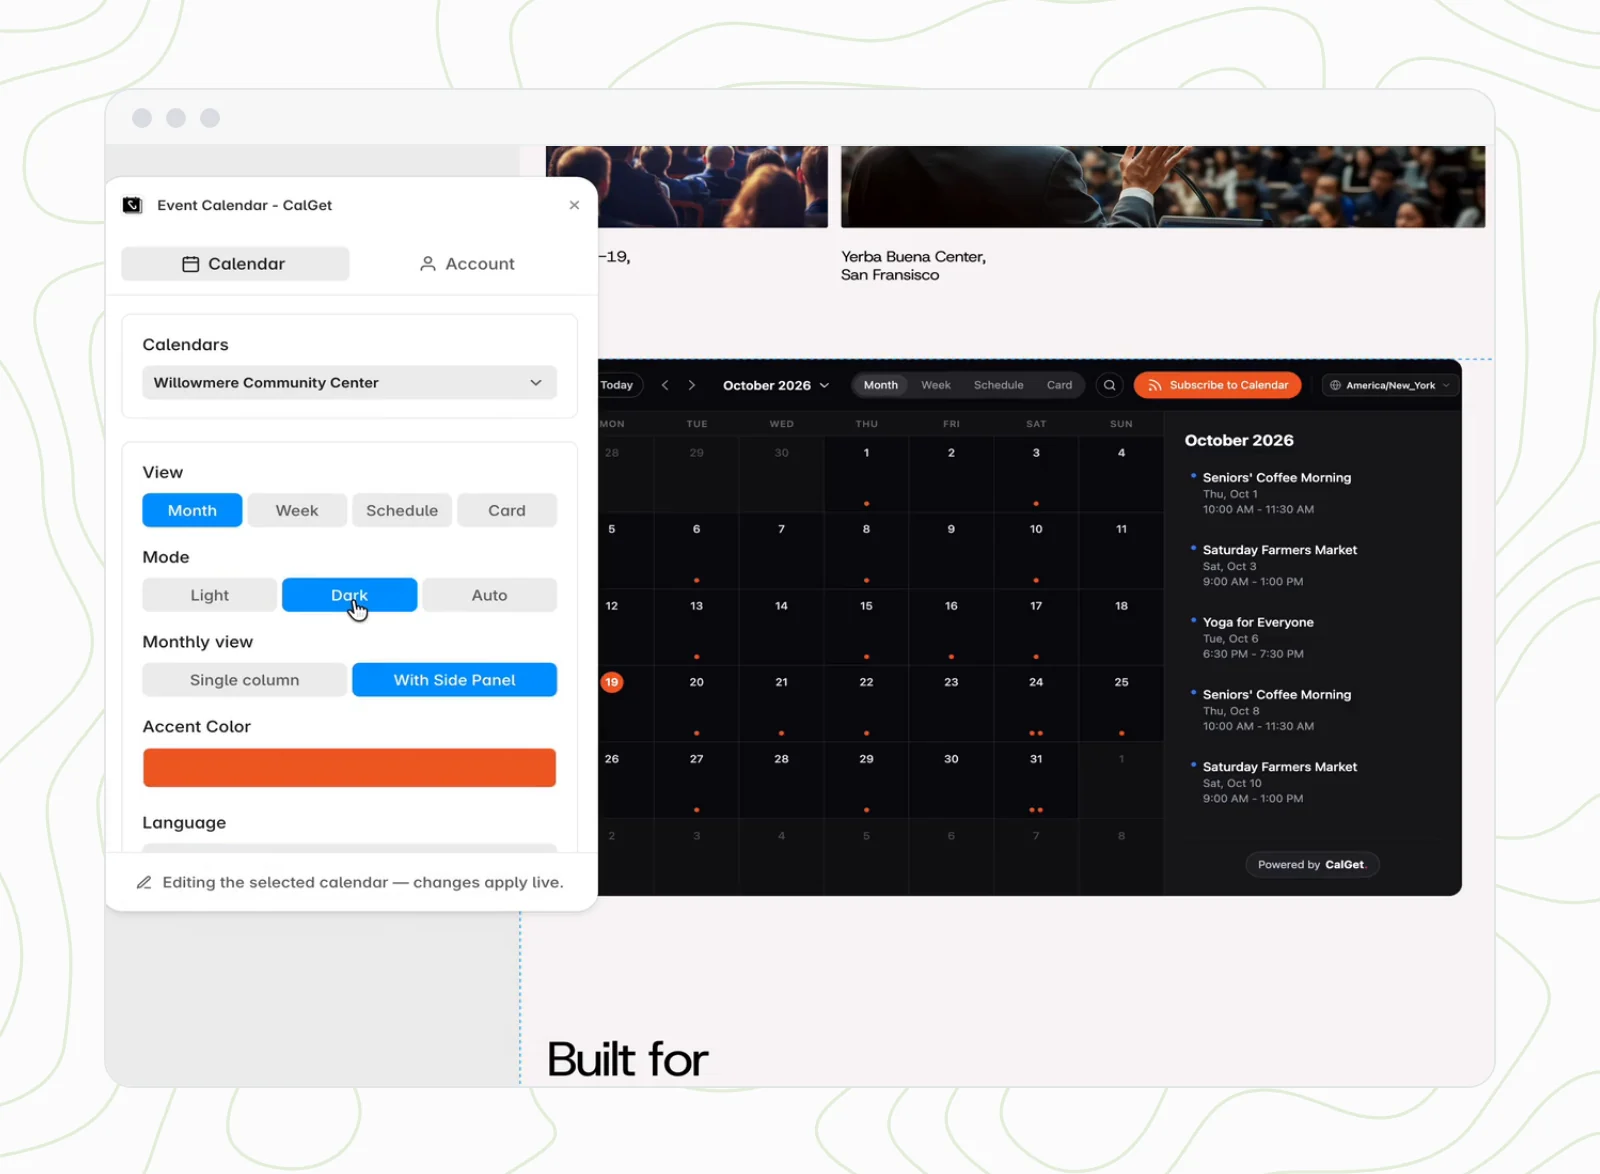
- Mode: Light, Dark, or Auto to follow each visitor's system setting.
Step 6: Preview, then publish
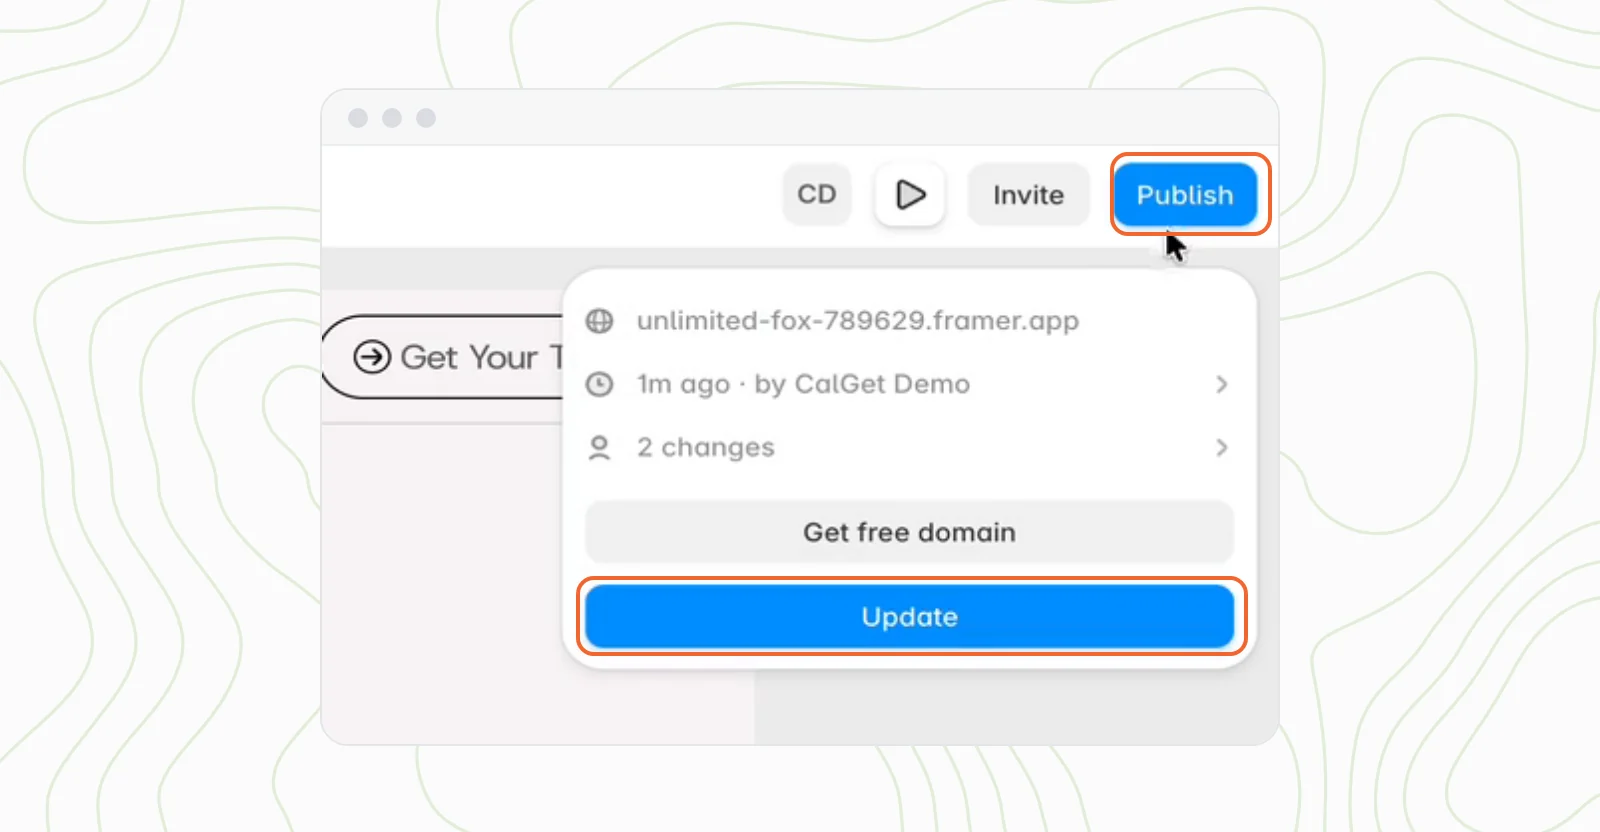
Click Preview to try the calendar the way visitors will: switch views, open an event, search. When it looks right, click Publish, then Update.
Step 7: Allow your site's address in CalGet
Open your live site. The first time, you'll likely see Access Restricted where the calendar should be: "The calendar is not allowed on this domain." That's CalGet protecting your calendar. It only shows on websites you've allowed, so nobody can put your calendar on their site. It still shows in Framer's editor and Preview, which is why you only see the message on the live site.
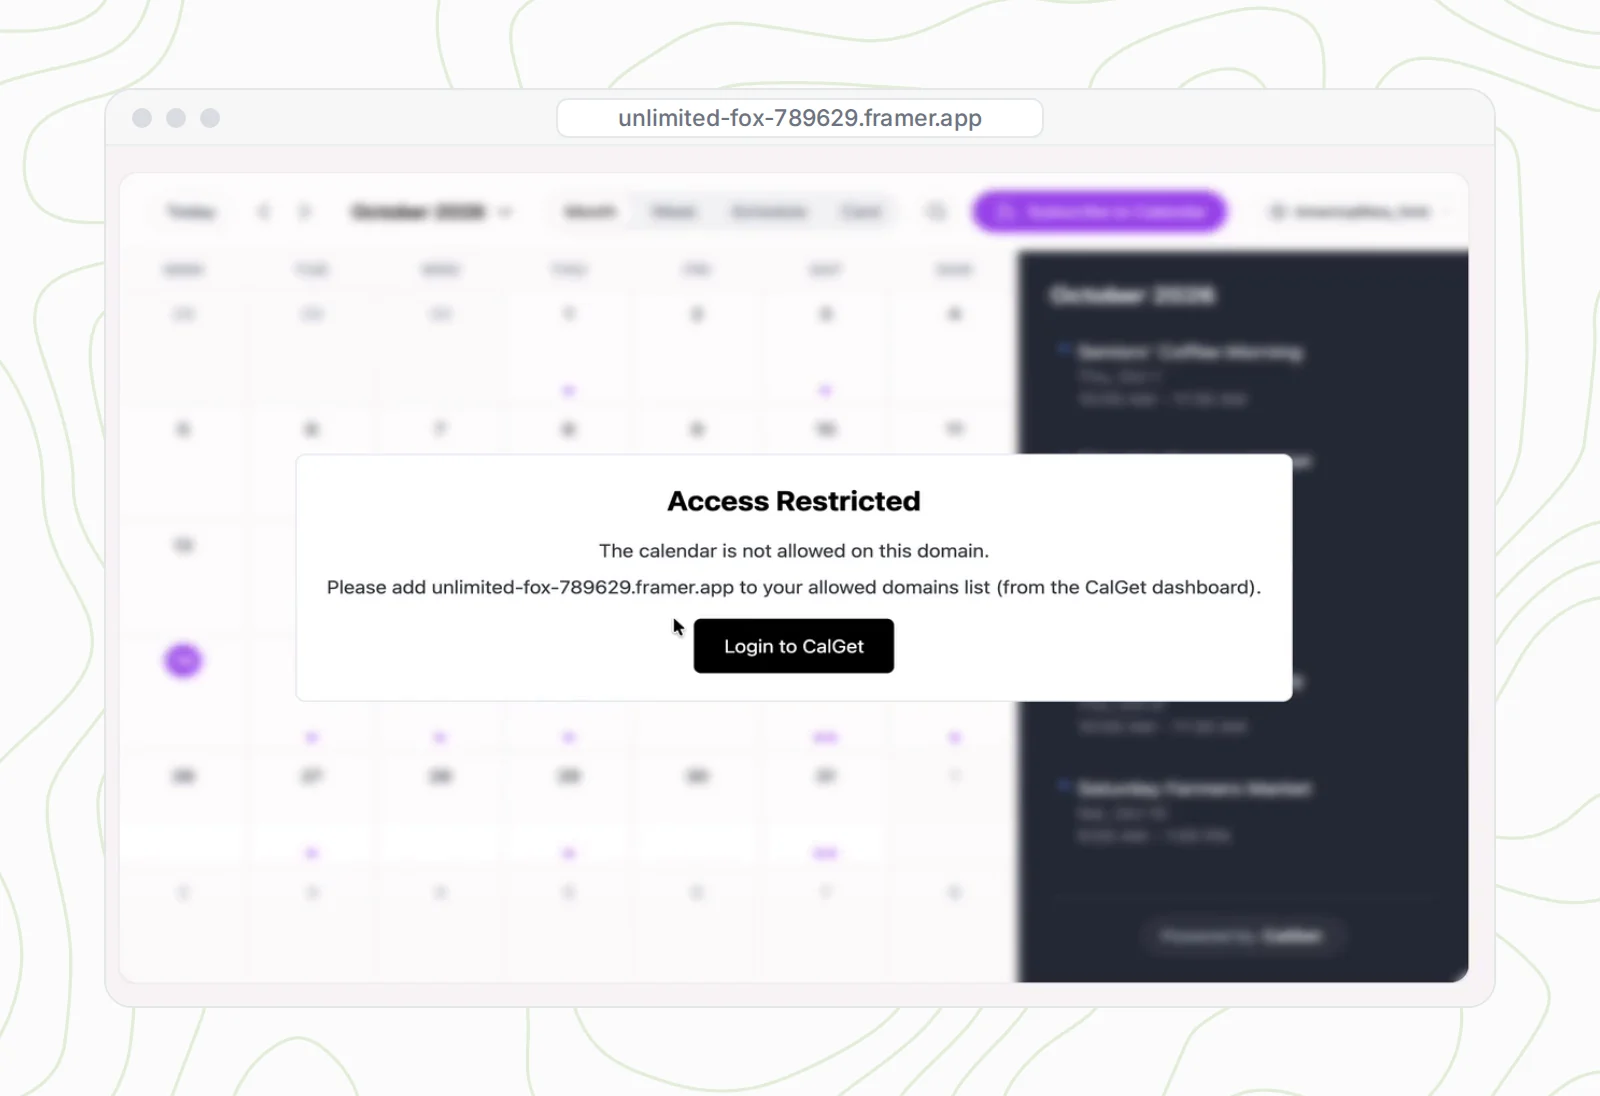
The message tells you the address to add. In CalGet, open Embeddable Calendar, click Domains, then Add Domain. Enter your site's address without http:// or https://, for example your-site.framer.app, and click Add Domain.
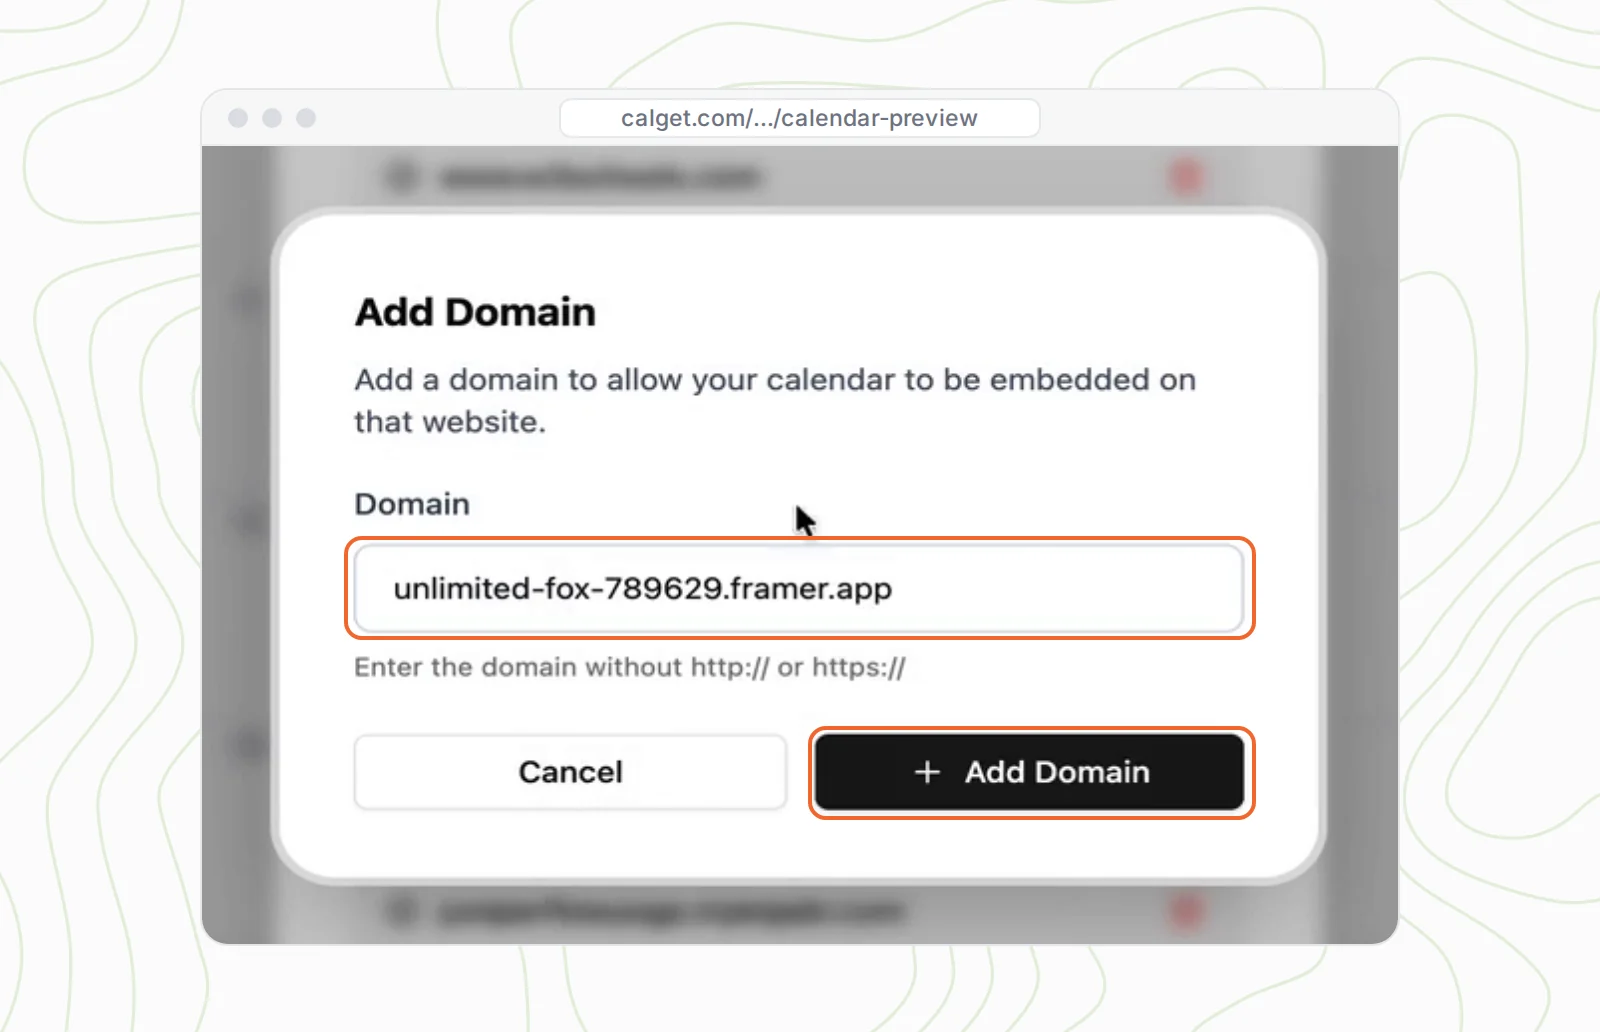
Refresh your site, and the calendar is live. If you've connected a custom domain to your Framer site, add that address too (for example www.yourdomain.com), since that's where most visitors will see it.
What your visitors can do with the calendar
Visitors click a day to see its events, then click an event for the details: date, time, location and description. Add to Calendar saves it to Google Calendar, Apple Calendar, Outlook or Yahoo, or downloads an ICS file. They don't need an account for any of it.
Subscribe to Calendar goes further: one click, and every event you add later appears in the visitor's own Google Calendar, Apple Calendar, Outlook or Office 365, with changes kept in sync. For a club, a venue or a recurring program, that's the difference between people checking your site and your events simply being in their week. Our guide to subscription calendars explains how it works.
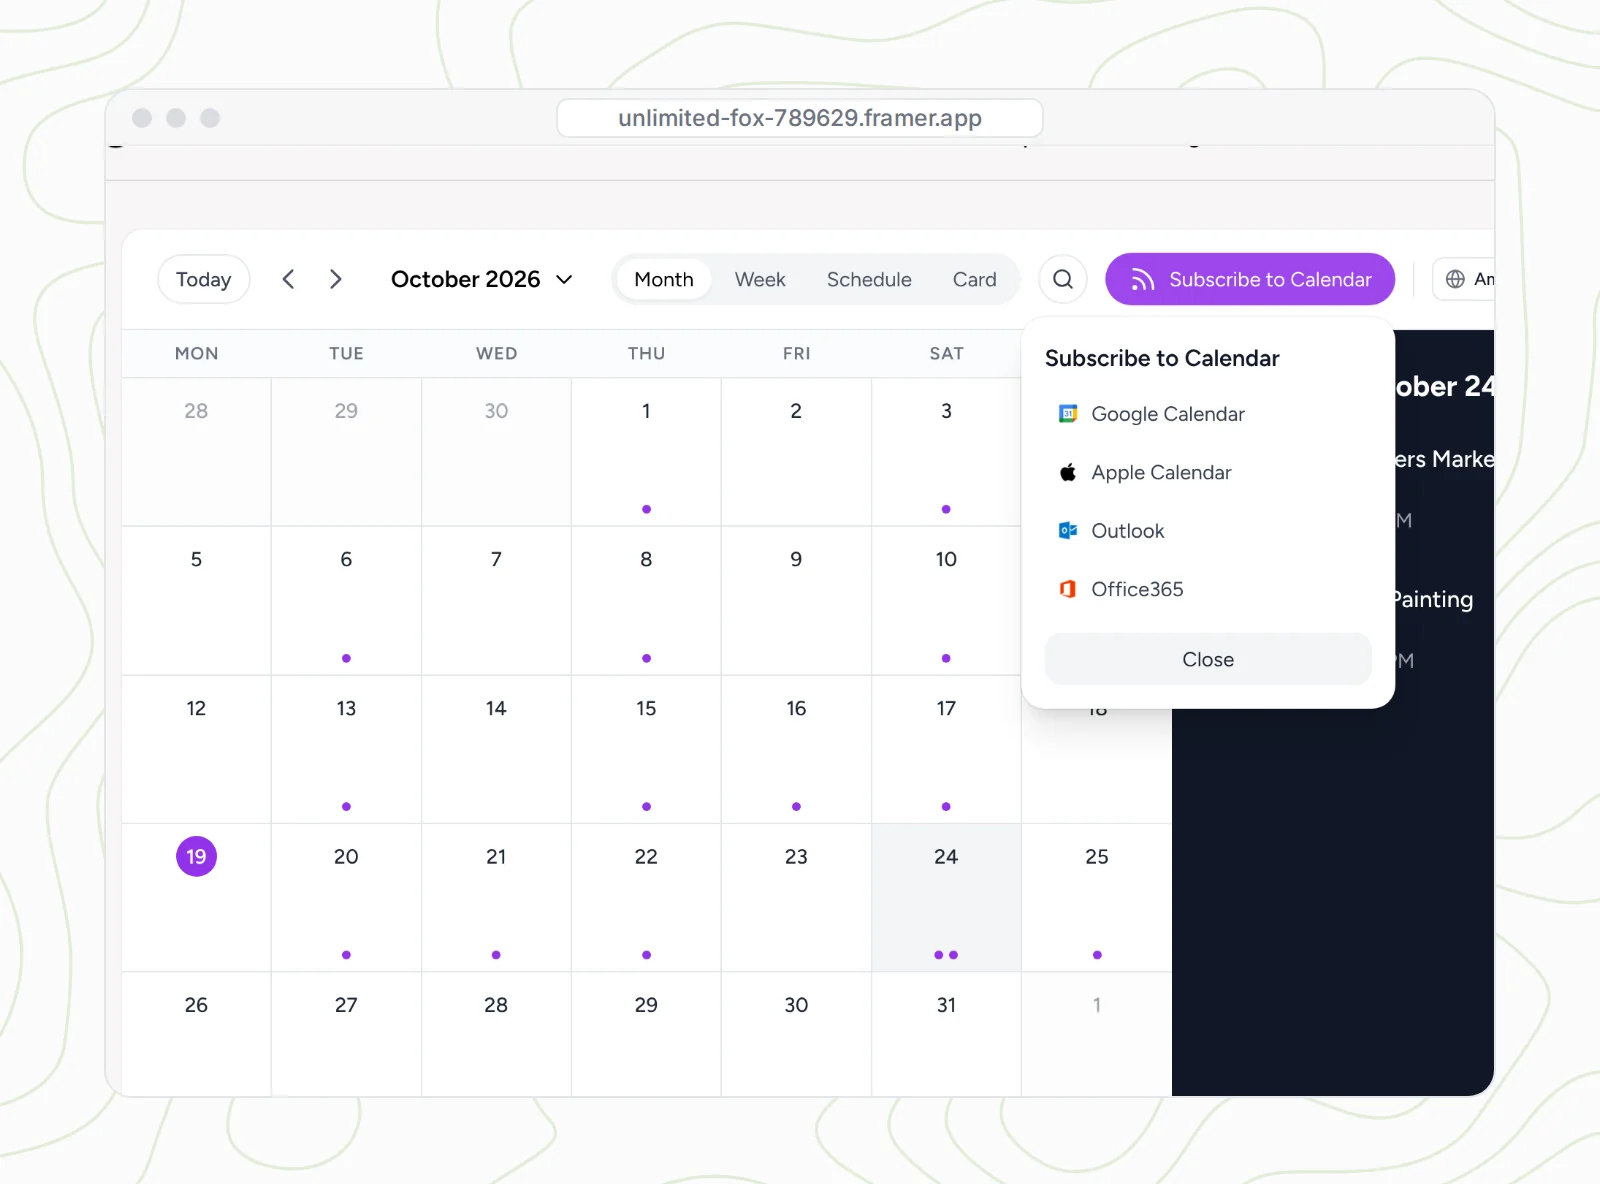
When plans change, change the event in CalGet. The calendar on your Framer site loads your events from CalGet, so you don't need to republish for a new event, a new time or a cancellation.
How to add Google Calendar to Framer
If your events already live in Google Calendar, you have two options.
Option 1: Sync Google Calendar into CalGet, then use the plugin
Keep adding events in Google Calendar and show them on your Framer site with everything above: your colors, four views, Add to Calendar and Subscribe.
- In Google Calendar, open Settings, pick your calendar, and under Integrate calendar copy its address in iCal format (the public one if the calendar is public, otherwise the secret one).
- In CalGet, open your calendar, go to External Calendars and click Add External Calendar. Paste the address. (External Calendars is on the Standard and Professional plans.)
- In the Framer plugin, pick that CalGet calendar and insert it.
Outlook calendars and other iCal (ICS) feeds work the same way. Our guide on embedding Google Calendar in your website covers the sync in more detail.
Option 2: Paste Google's embed code into Framer's Embed component
Google Calendar's settings also give you an iframe. Pasted into Framer's Embed component, it shows Google's own calendar view. The calendar has to be public for visitors to see it, the styling options are limited to Google's, and visitors can only save events to Google Calendar. It's fine for a quick internal page; for a public events page, Option 1 gives visitors more.
Make your Framer calendar work on phones
Framer lays out each breakpoint separately. If your site only has a Desktop breakpoint, phones get a scaled-down copy of the desktop page, calendar included, and everything gets small. Add Tablet and Phone breakpoints, set the calendar to fill the width on each, give it enough height, and check it at phone size in Preview before you publish. On narrow screens, Schedule or Card view is often easier to read than a full month.
Mistakes that make a Framer calendar look broken
- Skipping the Domains step. The editor and Preview look fine, then the live site says Access Restricted. Add your framer.app address, and your custom domain if you use one.
- Typing https:// in the domain field. Enter the address only, like
your-site.framer.app. - Making the box too short. Month view with a side panel needs height. If the last week is cut off, drag the bottom edge down.
- Pasting your API key anywhere public. It belongs in the plugin only. If it leaks, regenerate it in Team Management.
- Forgetting the time zone. Set it on your events in CalGet, and choose whether the calendar shows the visitor's time zone or yours.
How we tested this
In October 2026 we set up the Event Calendar - CalGet plugin on a real Framer project, the BuildWithAI Summit demo site, connected it to a CalGet team with an API key from Team Management, inserted the Willowmere Community Center calendar, and tried each option in the Calendar tab. We published the site, got the Access Restricted message, added the framer.app address under Domains, and tested the live calendar's day view, event details, Add to Calendar and Subscribe menus. Every screenshot comes from that project, with the API key blurred.
Frequently asked questions
Does Framer have a built-in events calendar?
No. Framer doesn't include an events calendar component. The quickest way to add one is the Event Calendar - CalGet plugin, which inserts a calendar component with month, week, schedule and card views that you can style on the canvas.
How do I add a calendar to my Framer website?
Open Plugins in Framer, search CalGet and open Event Calendar - CalGet. Connect it with your CalGet API key, pick your calendar, click Insert Event Calendar, size it on your page and publish. Then allow your site's address under Embeddable Calendar → Domains in CalGet.
Why does my Framer calendar say "Access Restricted"?
CalGet only shows your calendar on websites you've allowed. In CalGet, open Embeddable Calendar → Domains → Add Domain and enter the address from the message, such as your-site.framer.app, without https. Refresh the page and the calendar appears.
Do I need to republish my Framer site when I add events?
No. The calendar loads your events from CalGet each time someone opens the page, so new, changed and canceled events show up on your site automatically. You only republish when you change the calendar's design or placement in Framer.
How do I add Google Calendar to Framer?
Copy your Google Calendar's iCal address from its settings, add it in CalGet under External Calendars, then insert that calendar with the Event Calendar - CalGet plugin. Your Google events show on your Framer site with your colors, Add to Calendar and Subscribe. You can also paste Google's own iframe into Framer's Embed component, but the calendar must be public and styling is limited.
Is the Framer calendar plugin mobile friendly?
The calendar resizes to the width you give it. Add Tablet and Phone breakpoints in Framer, set the calendar to fill the width on each, and Schedule or Card view reads best on small screens.
For Framer sites
Put your events calendar on your Framer site today
Create your calendar in CalGet, add your events (or sync them from Google Calendar), then insert it with the plugin. Visitors get Add to Calendar and Subscribe on every event.
Only need a button for a single event? Here's how to add an Add to Calendar button to your Framer website.

Written by the CalGet team
Updated October 2026 · Tested on a live Framer site with the Event Calendar - CalGet plugin
We build calendar tools for sharing events with lots of people, from sports clubs and schools to nonprofits. People at organizations like Harvard, Save the Children and OGC Nice use CalGet to get events into their audience's calendars.

“Great Add Event to Calendar platform. Easy to create events and add them to emails and websites. Support responds quickly to questions and provides clean and concise answers. Highly recommended.” Foto Guy, on Trustpilot
Get Your Events on Everyone's Calendar.
Generate universal "Add to Calendar" links that work everywhere. Perfect for social media, emails, and websites.


Written by
Yared