Back to Blog
How to Add an Events Calendar to Your Shopify Store (No App)
Most Shopify calendar apps are built for booking appointments, and Google's embed doesn't look like your store or fit a phone. Here's how to add a real events calendar to a Shopify page with the Custom Liquid section your theme already has, tested step by step.
Written by
Last updated: October 2026. We built every step below on a demo Shopify store using the Horizon theme, with a real CalGet calendar, in October 2026.
Quick answer
You can add an events calendar to your Shopify store without an app by pasting an embed code into a Custom Liquid section, which Online Store 2.0 themes like Horizon and Dawn already include. In short:
- Put your events in a CalGet calendar, then copy its embed code (Embeddable Calendar → Get embed code).
- Allow your store's domain in CalGet (Domains → Add Domain).
- In Shopify, create a page template called "events" and a page that uses it.
- In the theme editor, add a Custom Liquid section to that template, paste the code and save.
The calendar matches your brand colors, works on phones, and new events show up on your store without touching Shopify again.
You run classes, workshops or in-store events, and you want them on your Shopify store where customers can actually find them. So you search the Shopify App Store and find a wall of booking apps. They're built for appointments, not for showing what's on this month.
You're not the only one. On the Shopify Community forum, a soap maker asking for an events calendar found that most apps "are for appointments and not events." Another store owner, who just wanted to list craft shows, put it simply: "All the apps are more than I need."
This guide shows you how to add an events calendar to Shopify that looks like your store, fits on a phone and updates itself, using the Custom Liquid section your theme already has. No app, and no coding: you paste one embed code. If you've never used CalGet before, we start from the very beginning.
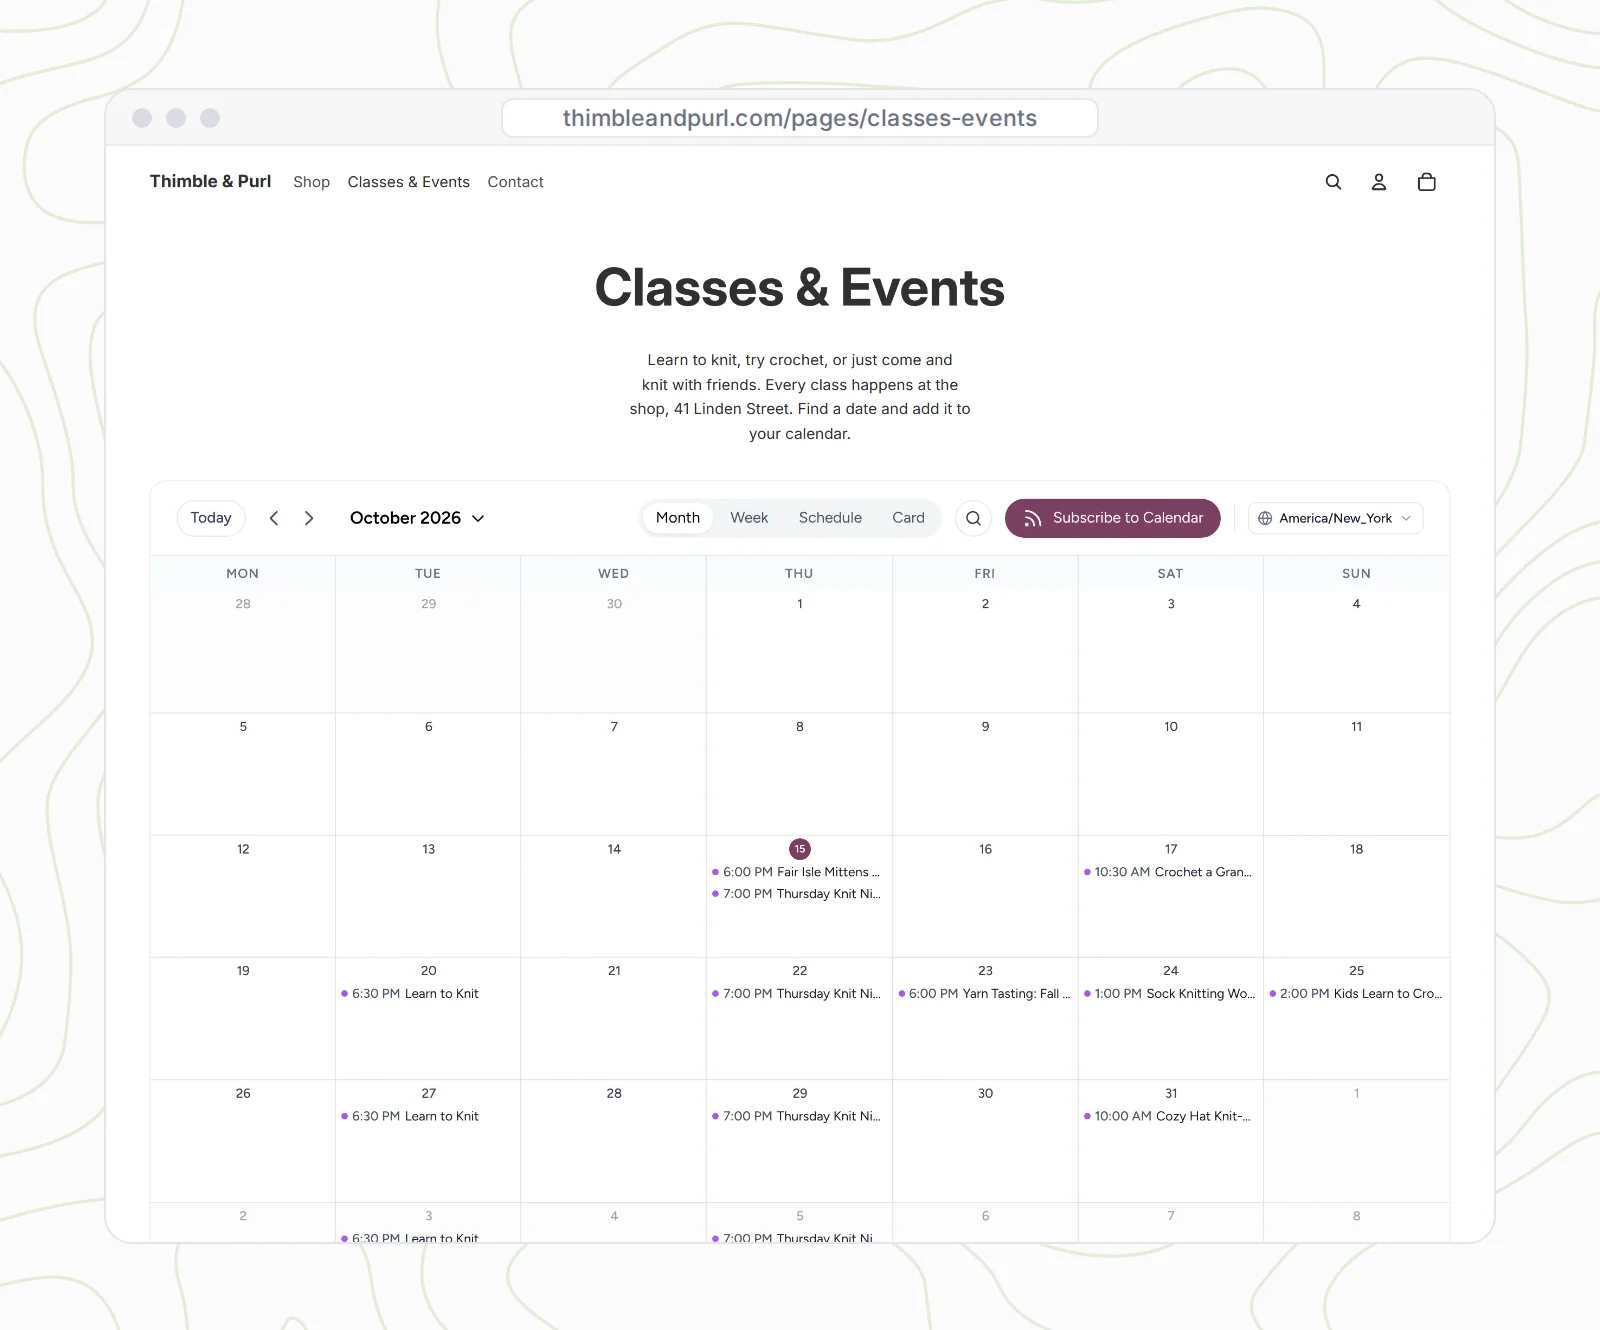
Here's what you'll have at the end. This is our demo yarn shop, Thimble & Purl, with its classes on its own Classes & Events page:
Prefer to watch? The full walkthrough is just under six minutes.
Your options for a Shopify events calendar
There are four common ways to show events on a Shopify store. They're not equal, so here's how they compare.
| Option | Looks like your store? | Easy to read on a phone? | Verdict |
|---|---|---|---|
| A booking or appointment app | Depends on the app | Usually | Built for time slots, not for a list of classes and events |
| Google Calendar's embed code | No, it looks like Google | No, it's cramped and fixed-size | Works, but looks out of place |
| A calendar hand-coded in Liquid | Yes | If it's built well | You'll need a developer, and you edit code for every change |
| An embeddable calendar in a Custom Liquid section | Yes, in your brand color | Yes, it switches to a phone layout | The one this guide uses |
The Custom Liquid section is the key. It's a regular section in Shopify's theme editor, and it accepts code you paste in, so you don't have to touch your theme files. You'll find it in Horizon, Dawn and other Online Store 2.0 themes.
Before you start
- A Shopify store with an Online Store 2.0 theme. We use Horizon, Shopify's current default theme. The steps are the same in Dawn and most modern themes.
- A CalGet account. That's where your events live. You'll create the calendar in Part 1.
- Your store's address, exactly as it shows in your browser's address bar (for example www.yourstore.com), and your myshopify.com address. You'll find both in Shopify under Settings → Domains.
Part 1: Create your events calendar
Step 1: Create a calendar for your store
In CalGet, open Calendars and click New Calendar. Give it your store's name and create it. Our yarn shop's calendar is called Thimble & Purl.
Step 2: Add your events
Click New Event and fill in the basics: a title, the date, the start and end time, the location and a short description. Customers will see all of it when they click the event on your store, so write the description for them. Our first class is Learn to Knit, Tuesday from 6:30 to 8:00 PM at the shop.
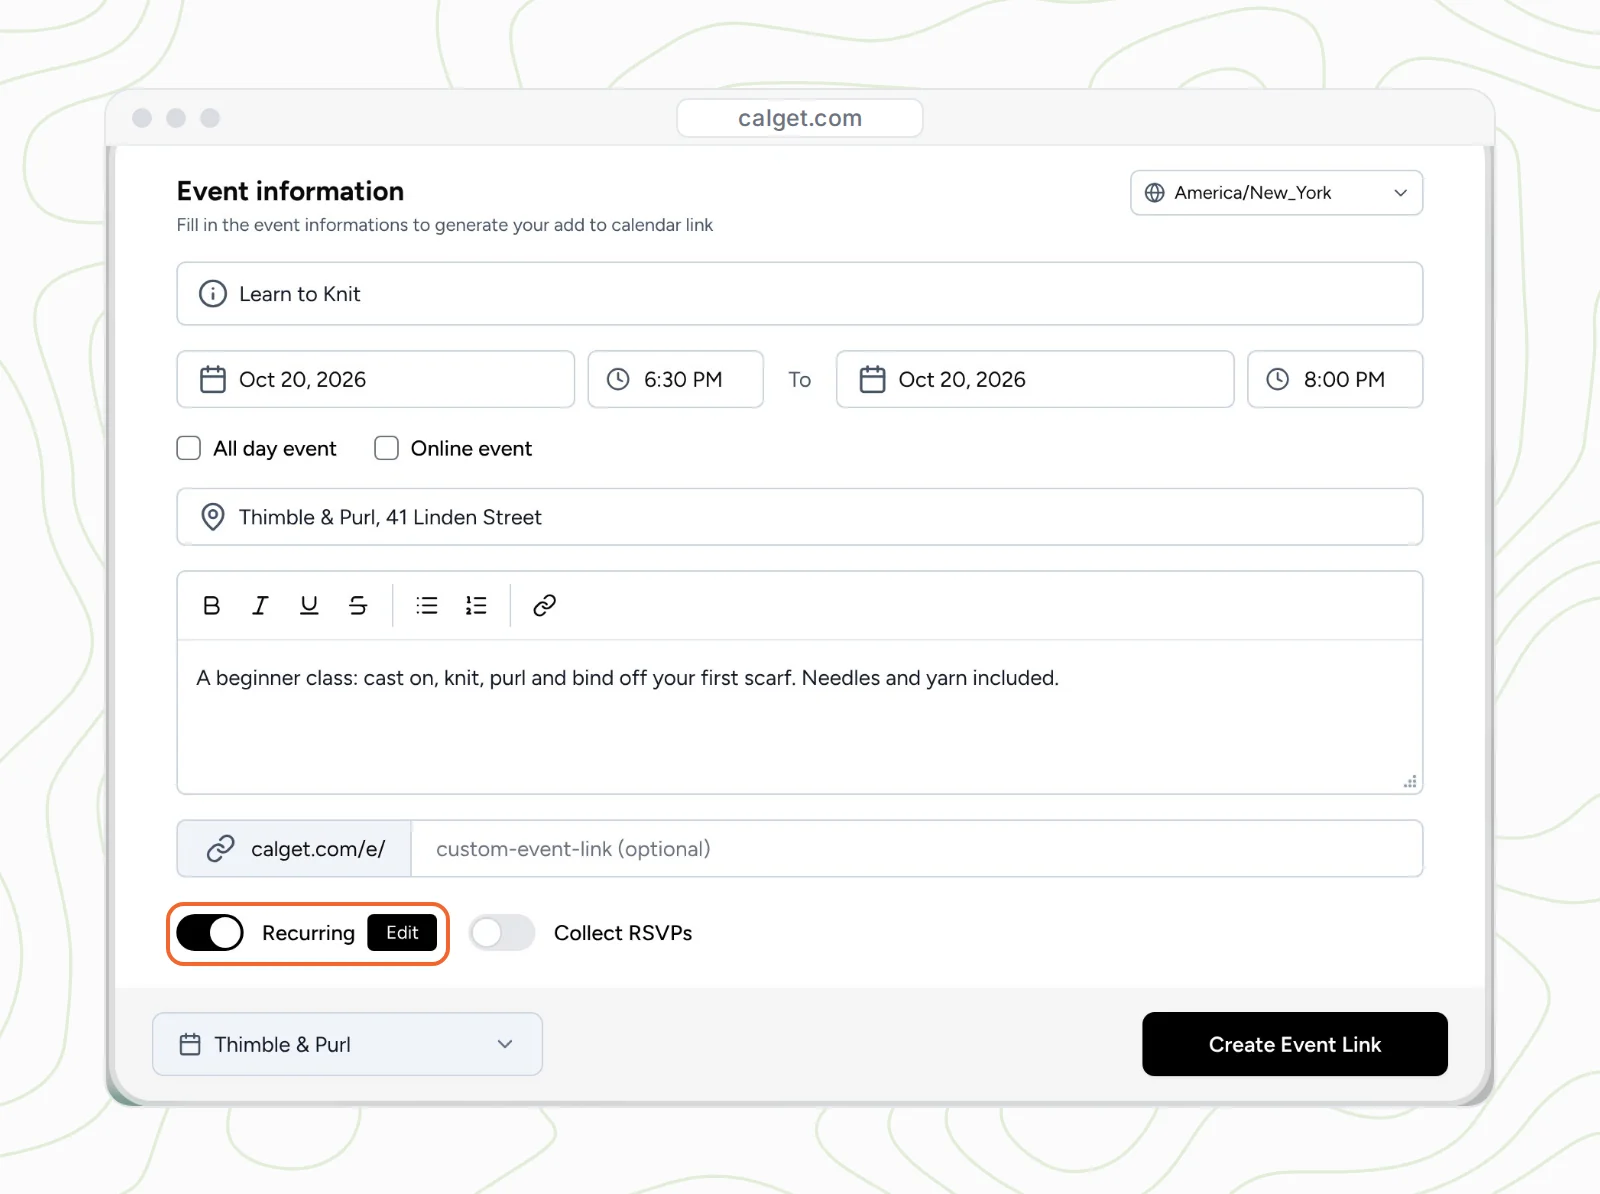
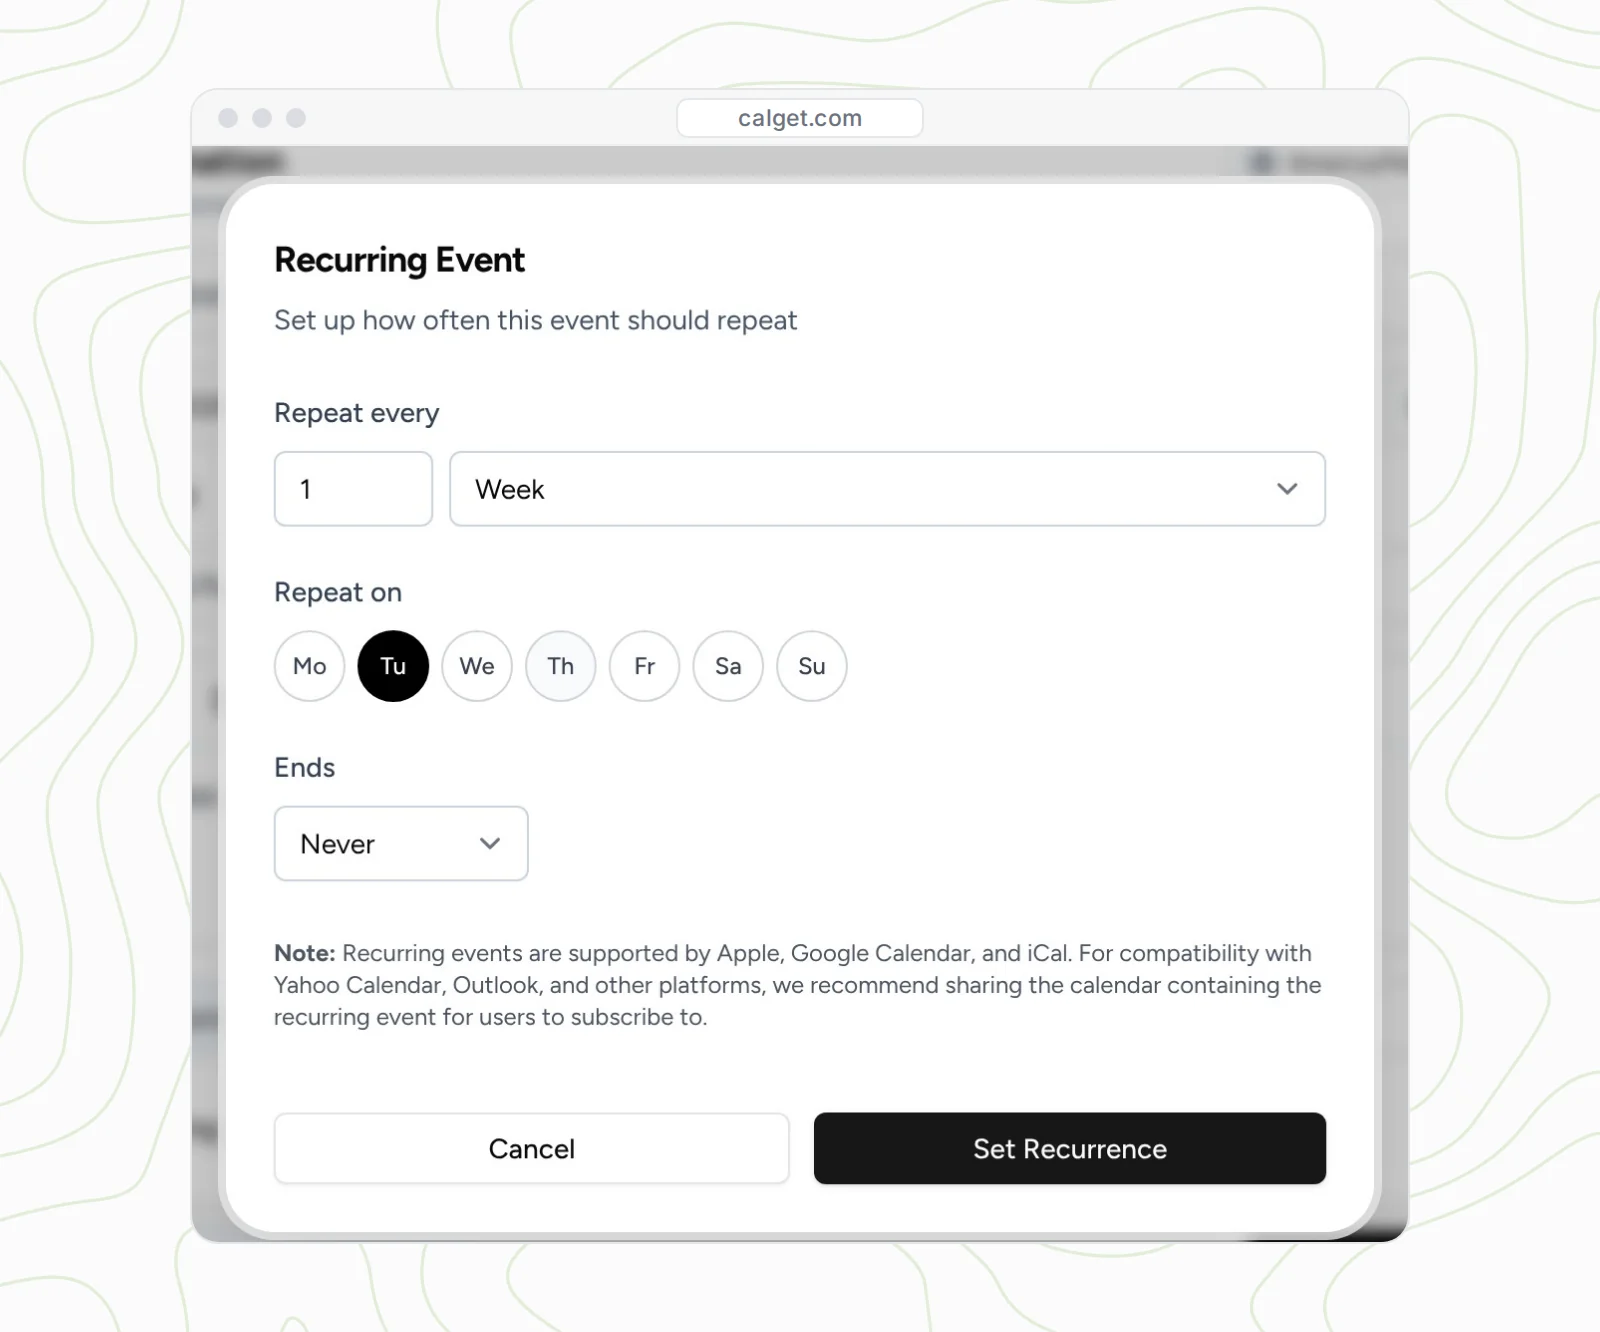
If the class runs every week, don't add it 52 times. Turn on Recurring, set it to repeat every 1 week, pick the day (Tuesday for us), choose when it ends (or leave it as Never), and click Set Recurrence. Then click Create Event Link to save the event.
Add the rest of your events the same way. Ours has a Thursday knit night, a crochet class, a yarn tasting, a kids' class and a few one-off workshops. New to repeating events? Here's how recurring events work.
Already keep your events in Google Calendar? You don't have to retype them. CalGet can sync a Google calendar in, and everything after this step stays the same. Our guide to embedding Google Calendar on your website covers the sync.
Part 2: Style it and copy the embed code
Step 3: Match your store's colors
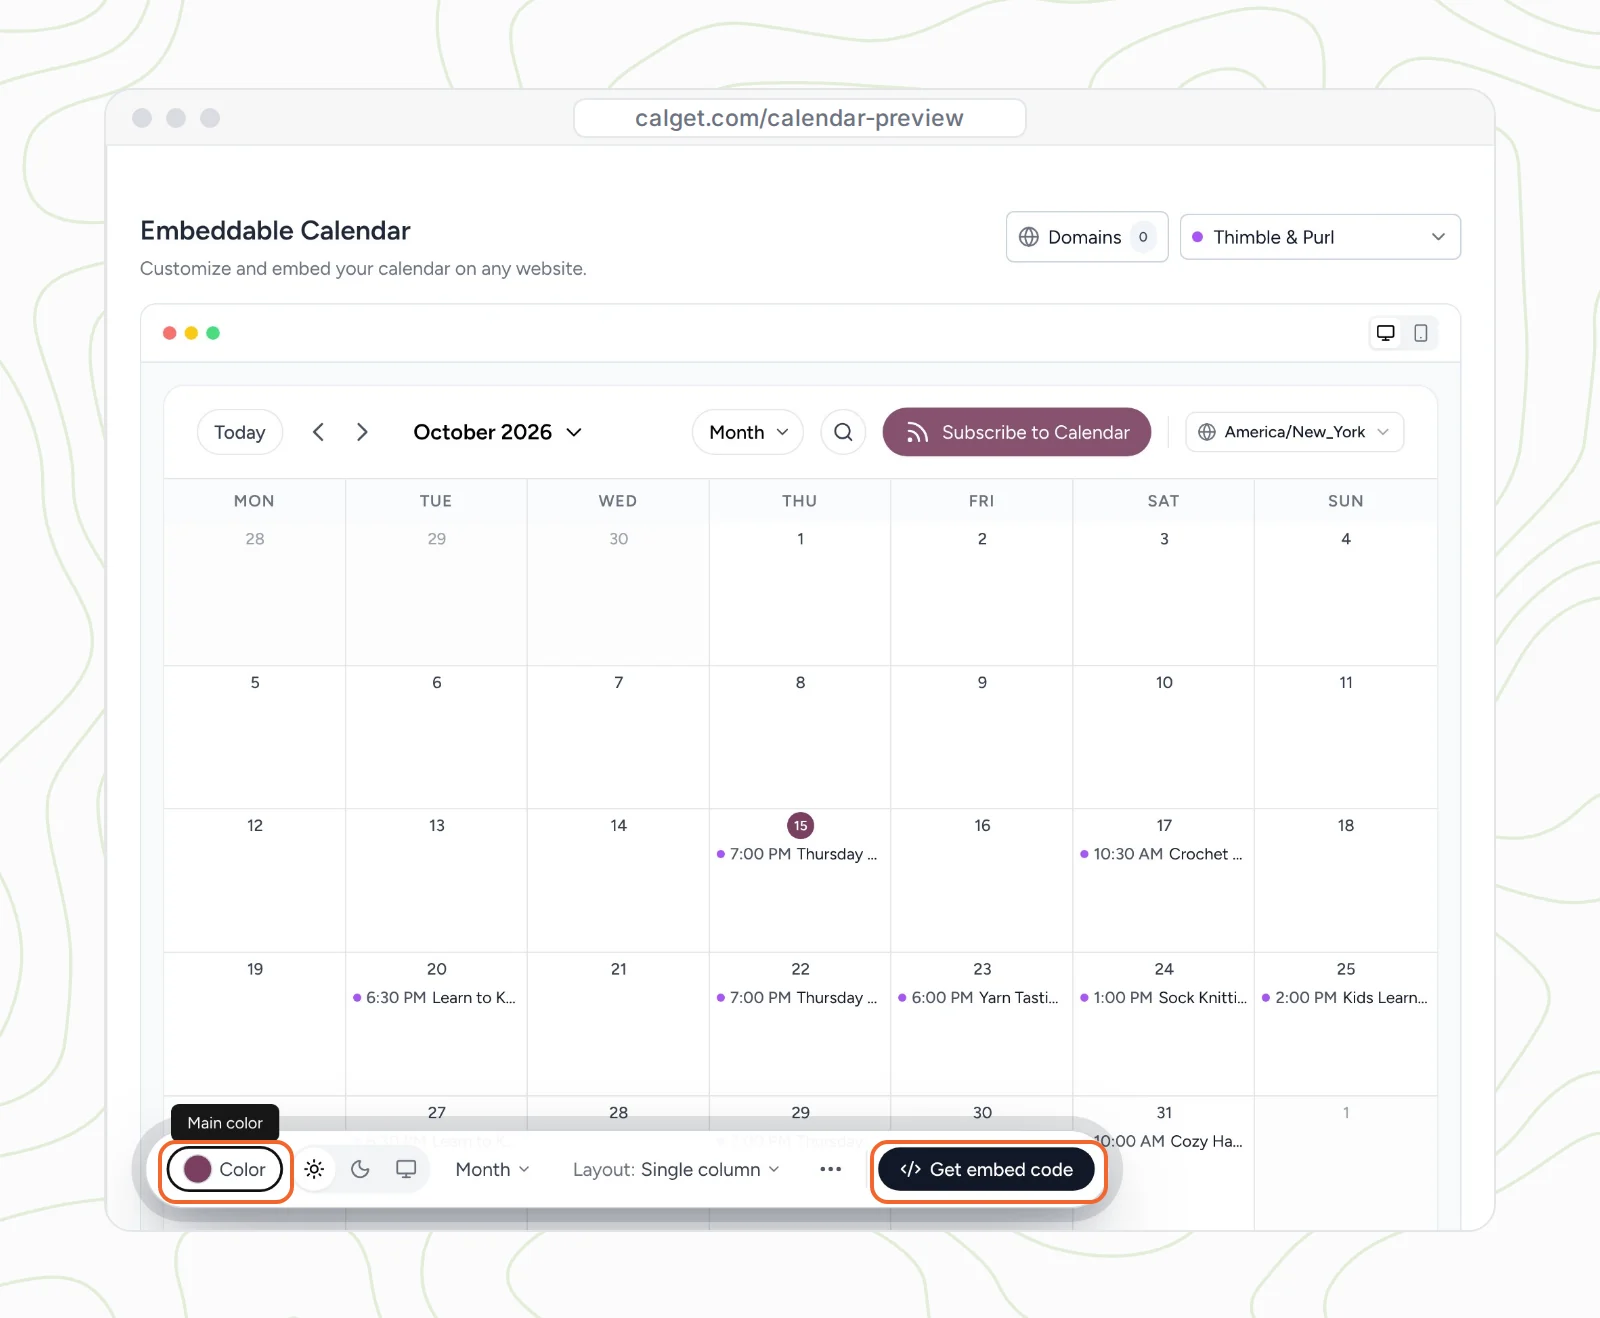
Open Embeddable Calendar and choose your calendar from the menu at the top right. Click Color and enter your brand color's hex code, so the calendar's buttons and highlights match your store. Thimble & Purl uses a deep plum, #7b3f61.
Then choose how the calendar opens: Month, Week, Schedule or Card view. Month works well for a class schedule. Schedule view, a simple list, is a good pick if you only run a few events a month.
Step 4: Allow your store's domain
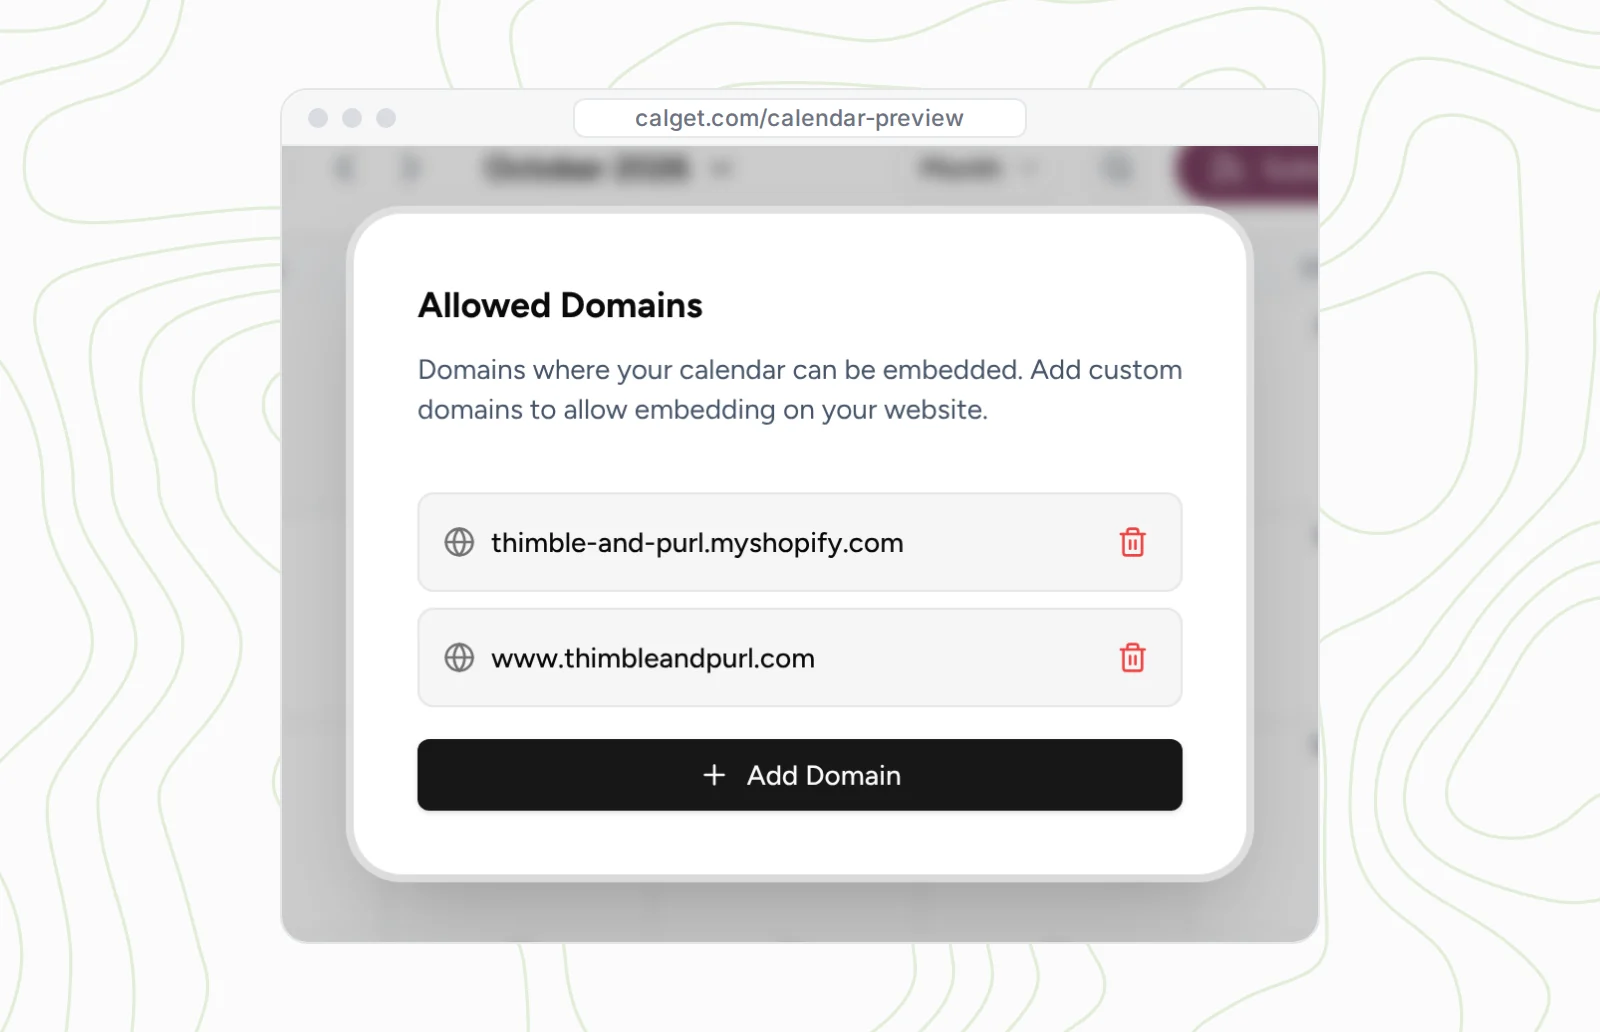
This step is easy to miss, and it's the most common reason a calendar doesn't show up. CalGet only displays your calendar on websites you've allowed, so nobody can copy your code onto their own site.
Click Domains at the top of the page, then Add Domain. Type your store's domain exactly as it appears in your browser's address bar, without http:// or https://. If your store opens as www.thimbleandpurl.com, enter it with the www.
Then add your myshopify.com address too (ours is thimble-and-purl.myshopify.com). Some embeds only show on the live store and not inside Shopify's theme editor, and allowing both addresses covers you either way.
Step 5: Copy the embed code
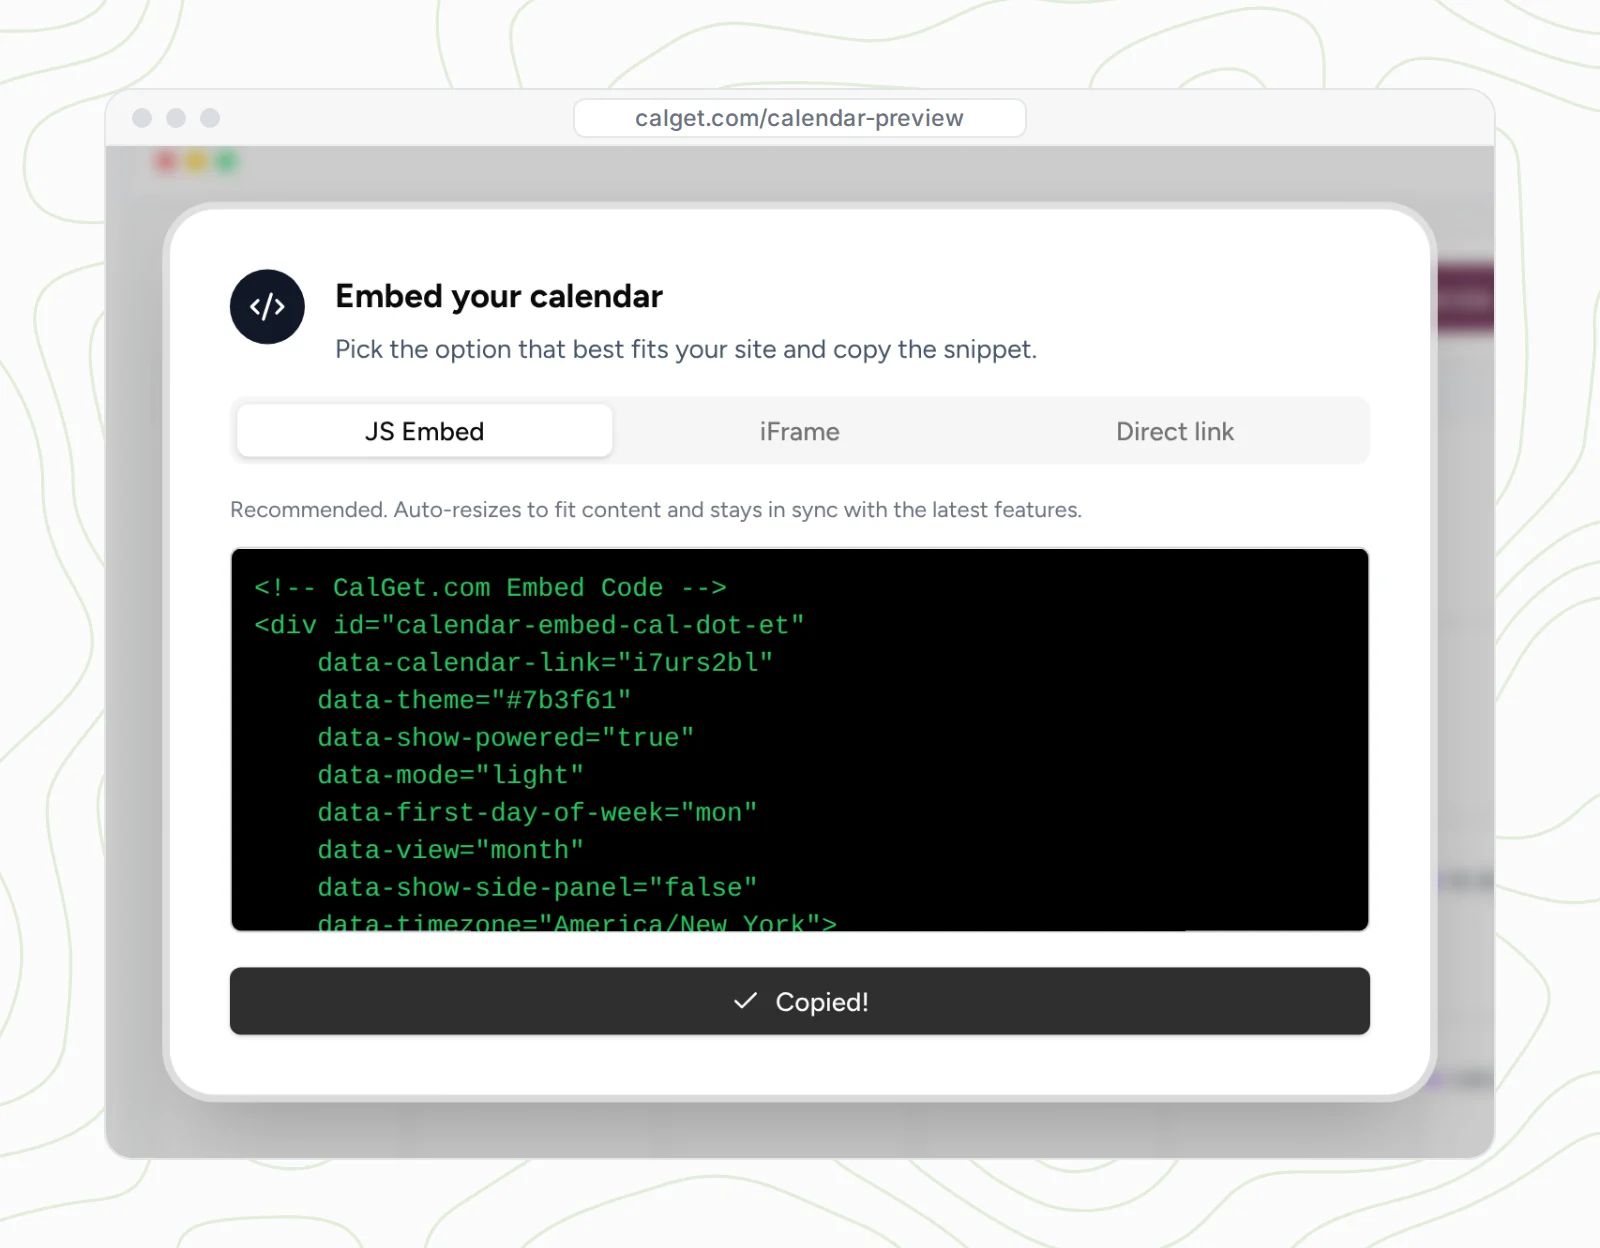
Click Get embed code. Keep the JS Embed tab selected, since it resizes itself to fit your page, and click Copy code. Your color and view settings are already in the code.
Part 3: Create an events page in Shopify
Why a separate template? In Shopify, pages share templates. If you add the calendar to the Default page template, it shows up on every page that uses it, like your About or Contact page. A template just for events keeps the calendar on your events page only. Shopify's help center explains how templates work if you want the details.
Step 6: Open the theme editor
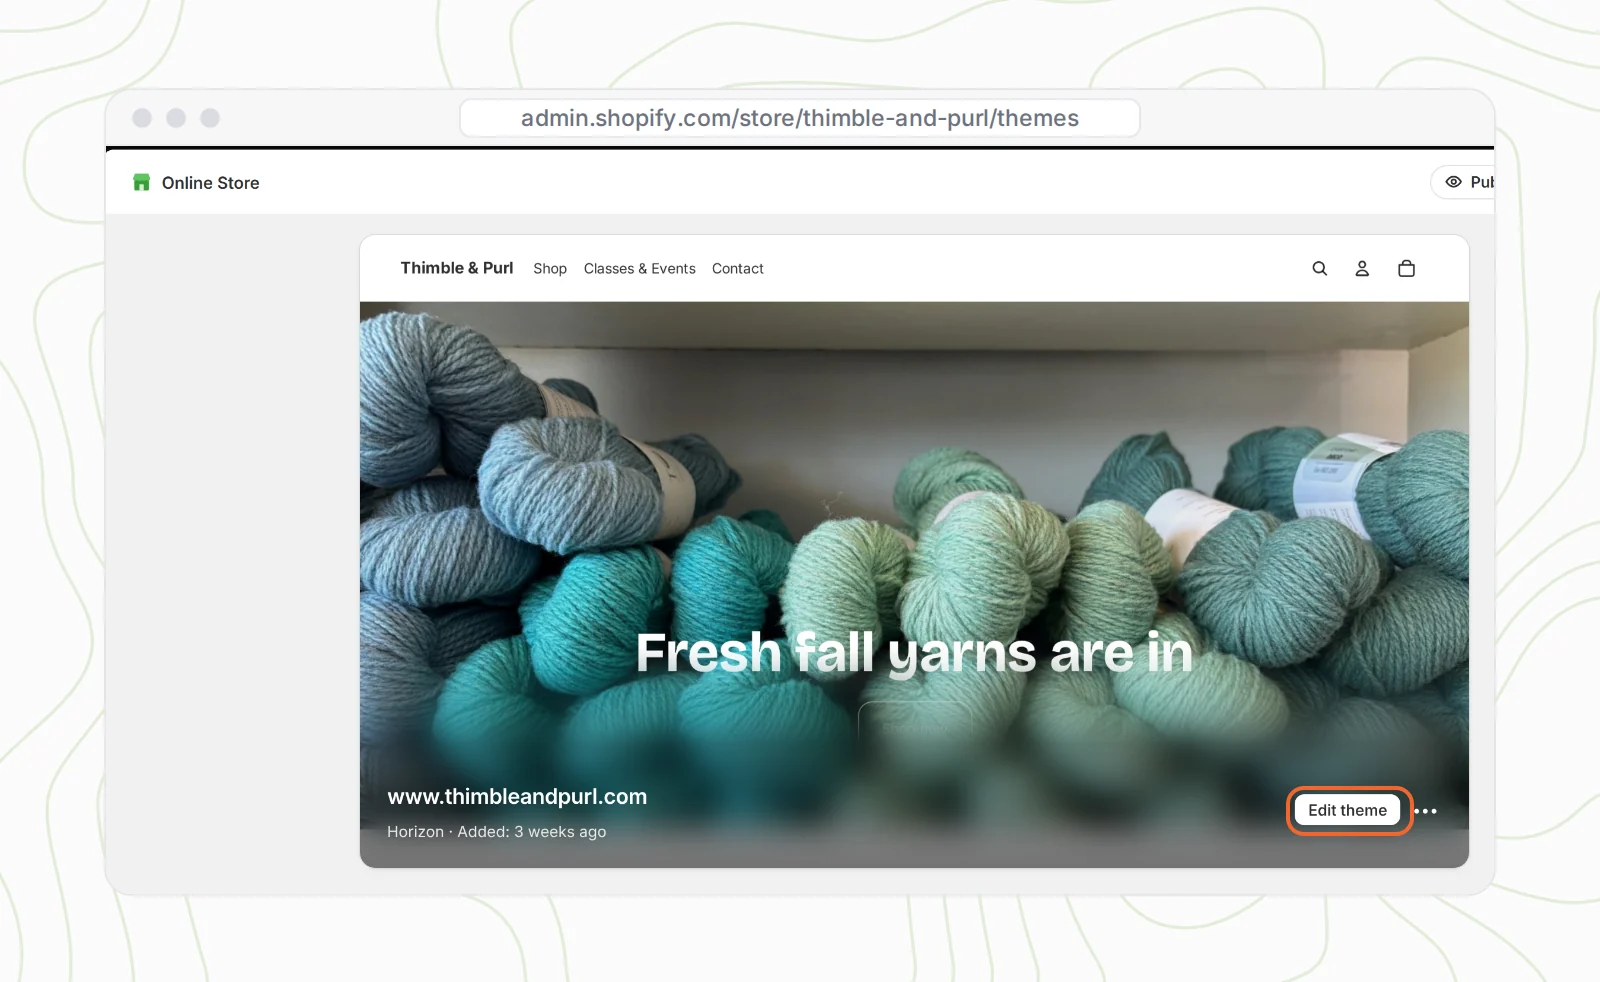
In your Shopify admin, go to Online Store and click Edit theme on your current theme.
Step 7: Create an "events" page template
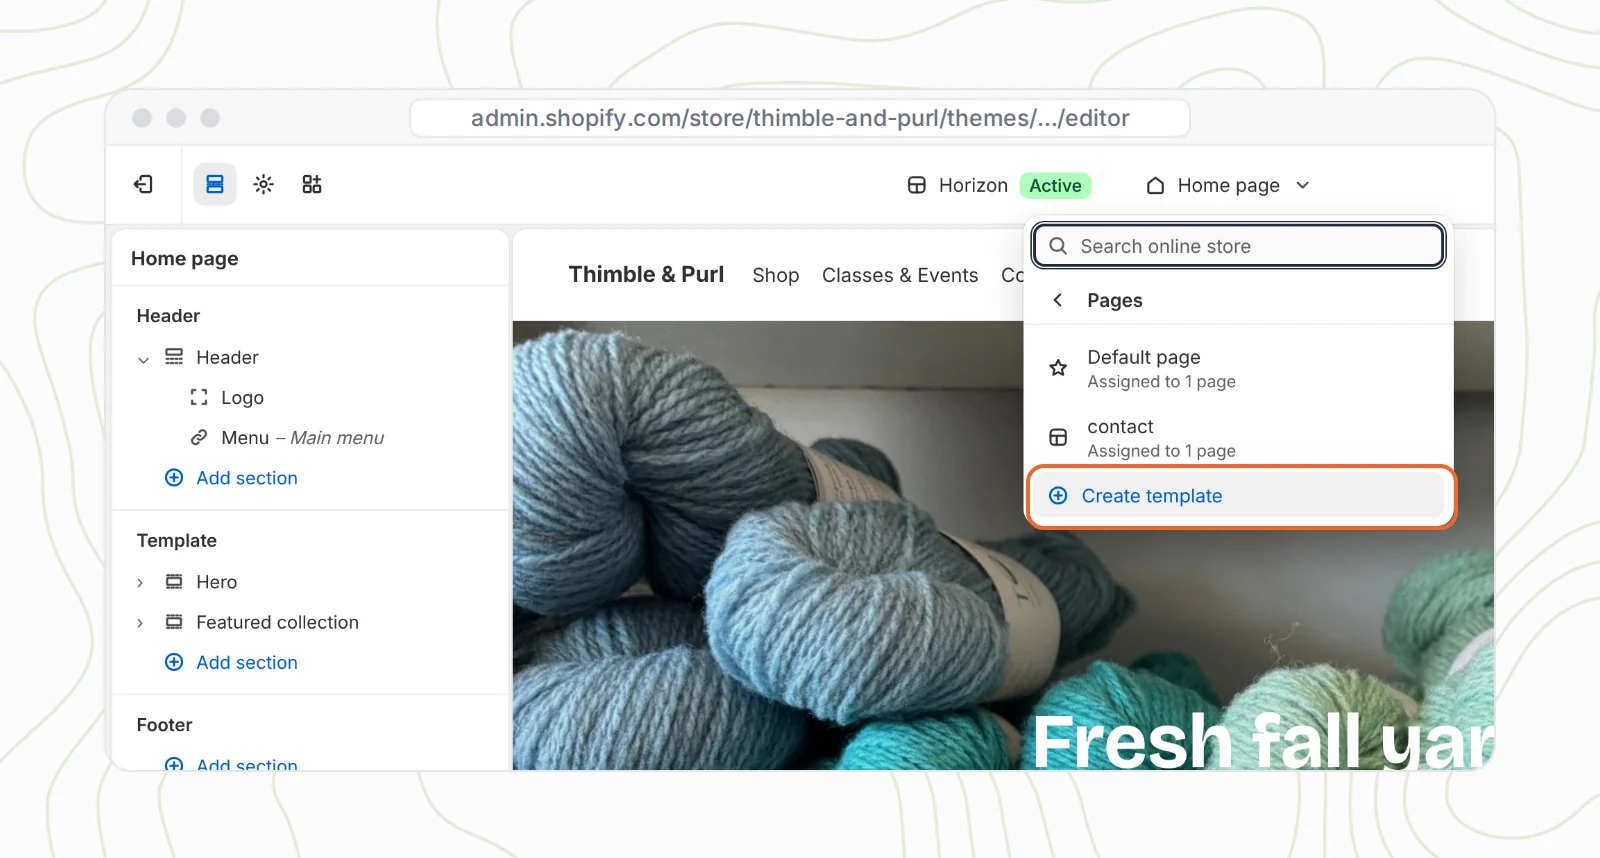
At the top of the theme editor, open the page menu (it says Home page at first). Go to Pages and click Create template.
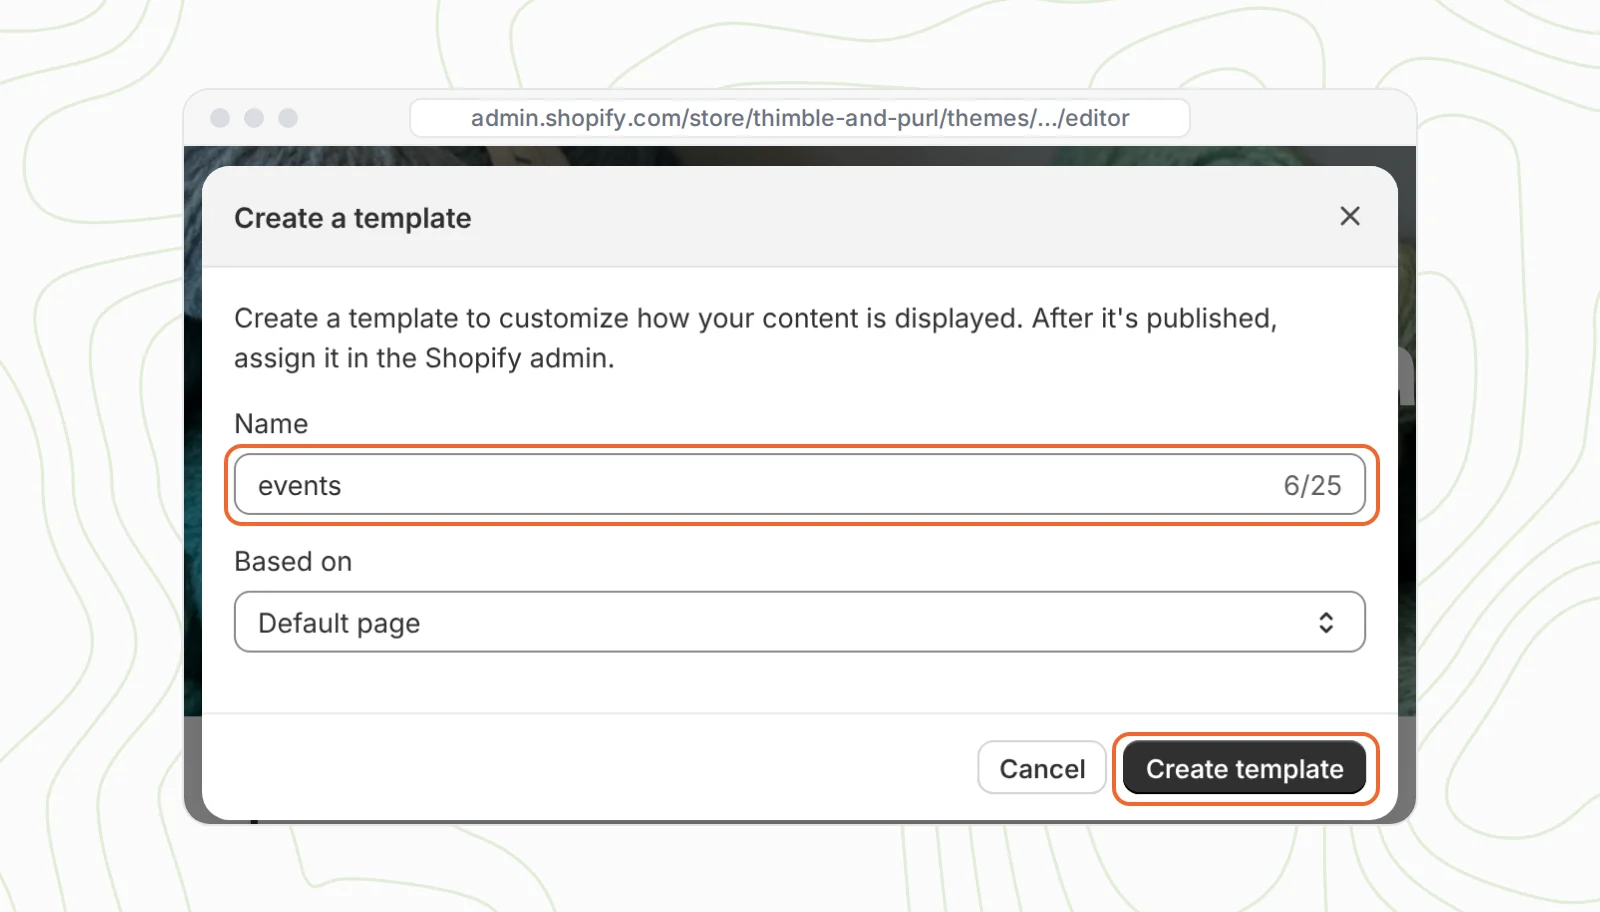
Name it events, keep it based on Default page, and click Create template. The new template starts as a copy of your default page layout, so it already has your header, footer and page title.
Step 8: Add your events page
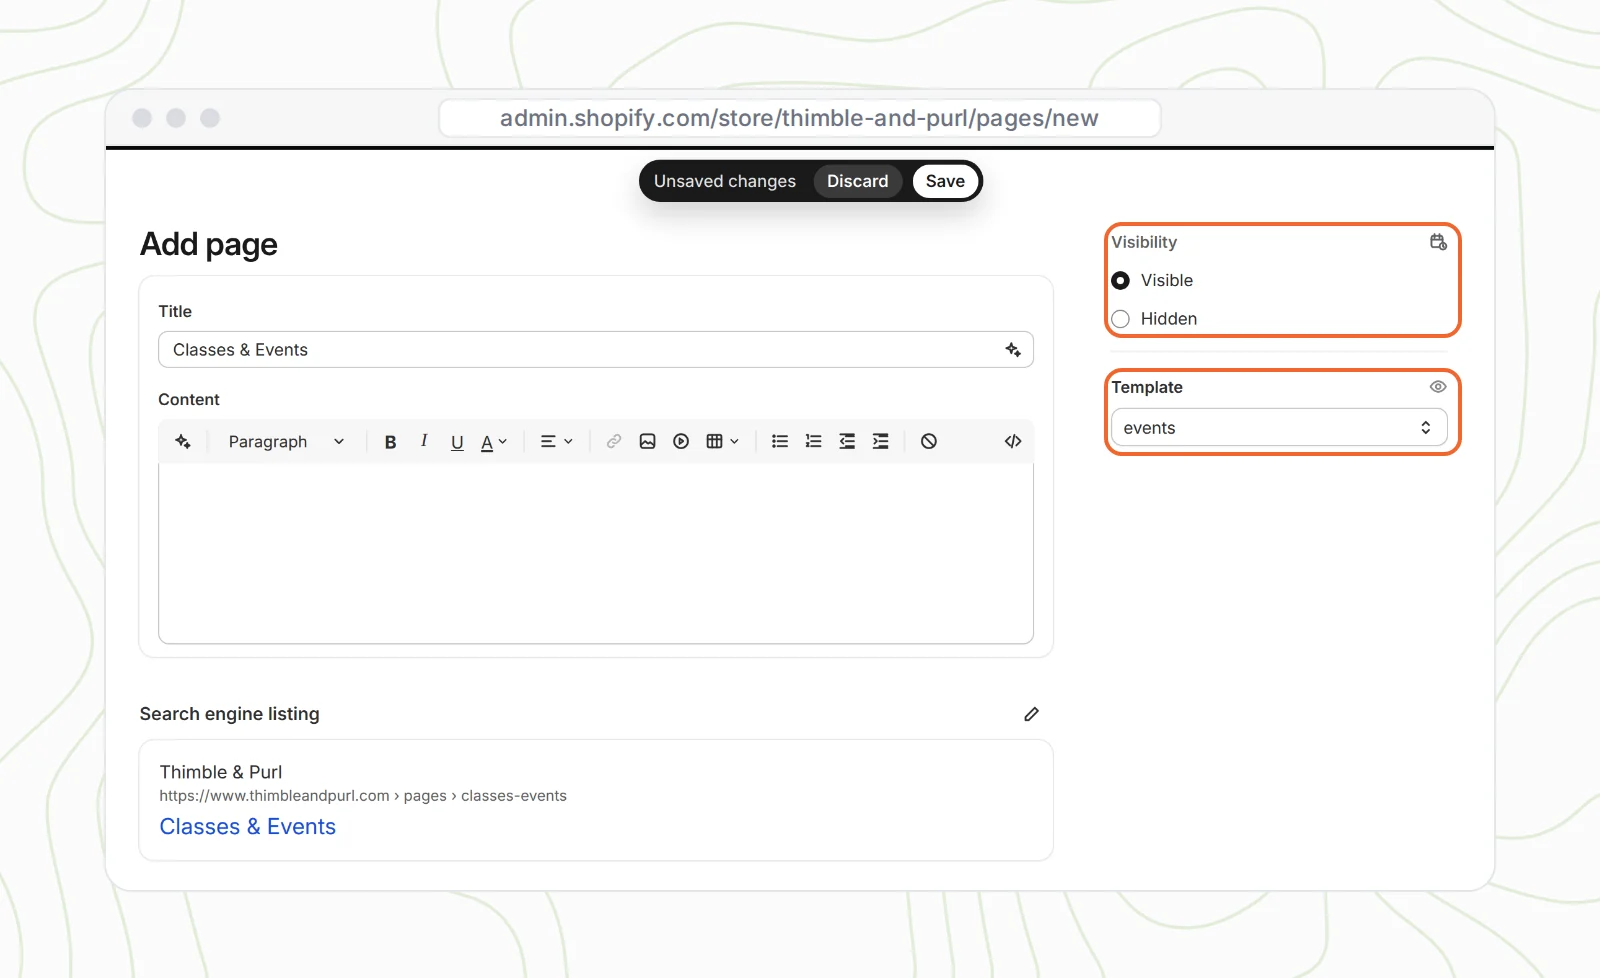
Back in the admin, go to Online Store → Pages and click Add page. Give it a title like Classes & Events. That's the page name customers see, and Shopify uses it for the page address too.
Two settings on the right matter here. First, Visibility: new pages start out Hidden, so switch it to Visible. Second, under Template, choose events. Then click Save.
Part 4: Add the calendar with a Custom Liquid section
Step 9: Add a Custom Liquid section
Go back to the theme editor and open your events template from the page menu (Pages → events). It now previews your Classes & Events page.
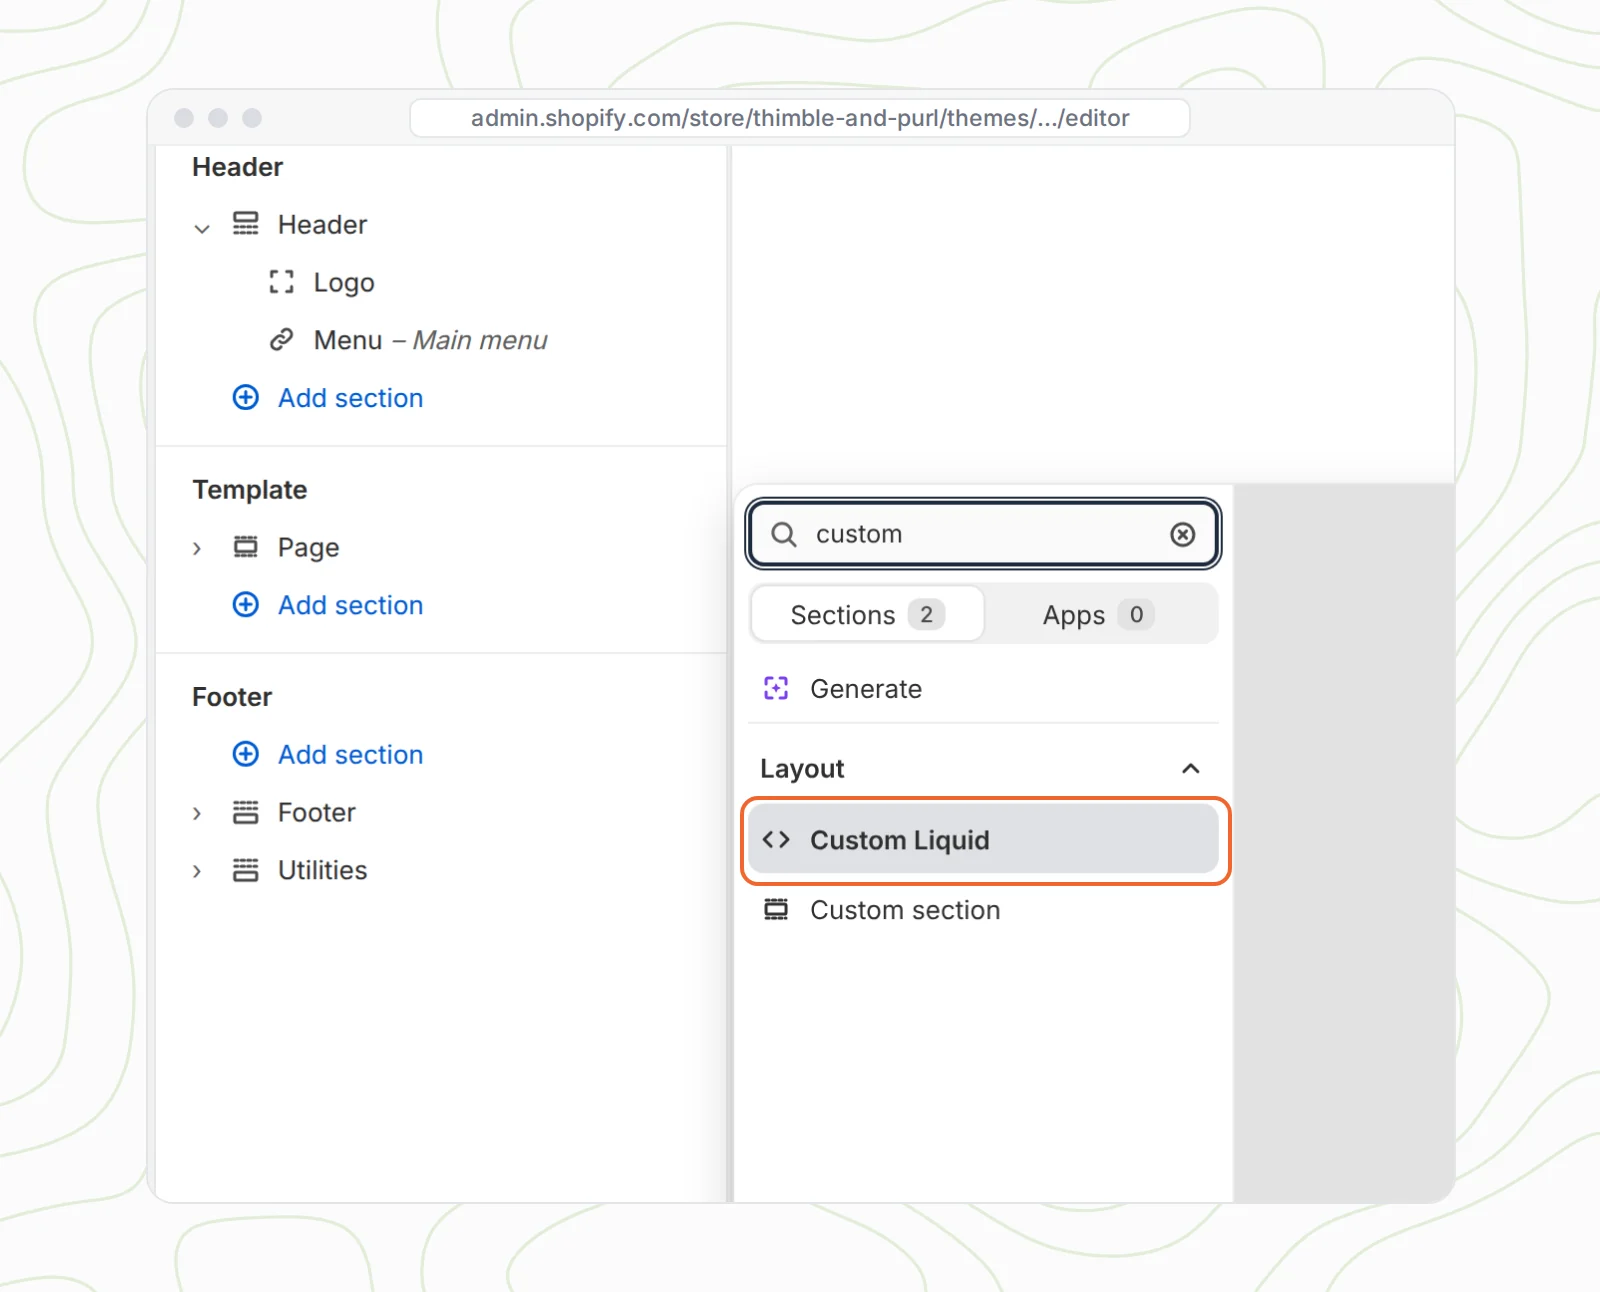
Under Template in the left sidebar, click Add section. Search for custom and choose Custom Liquid.
Step 10: Paste your CalGet code
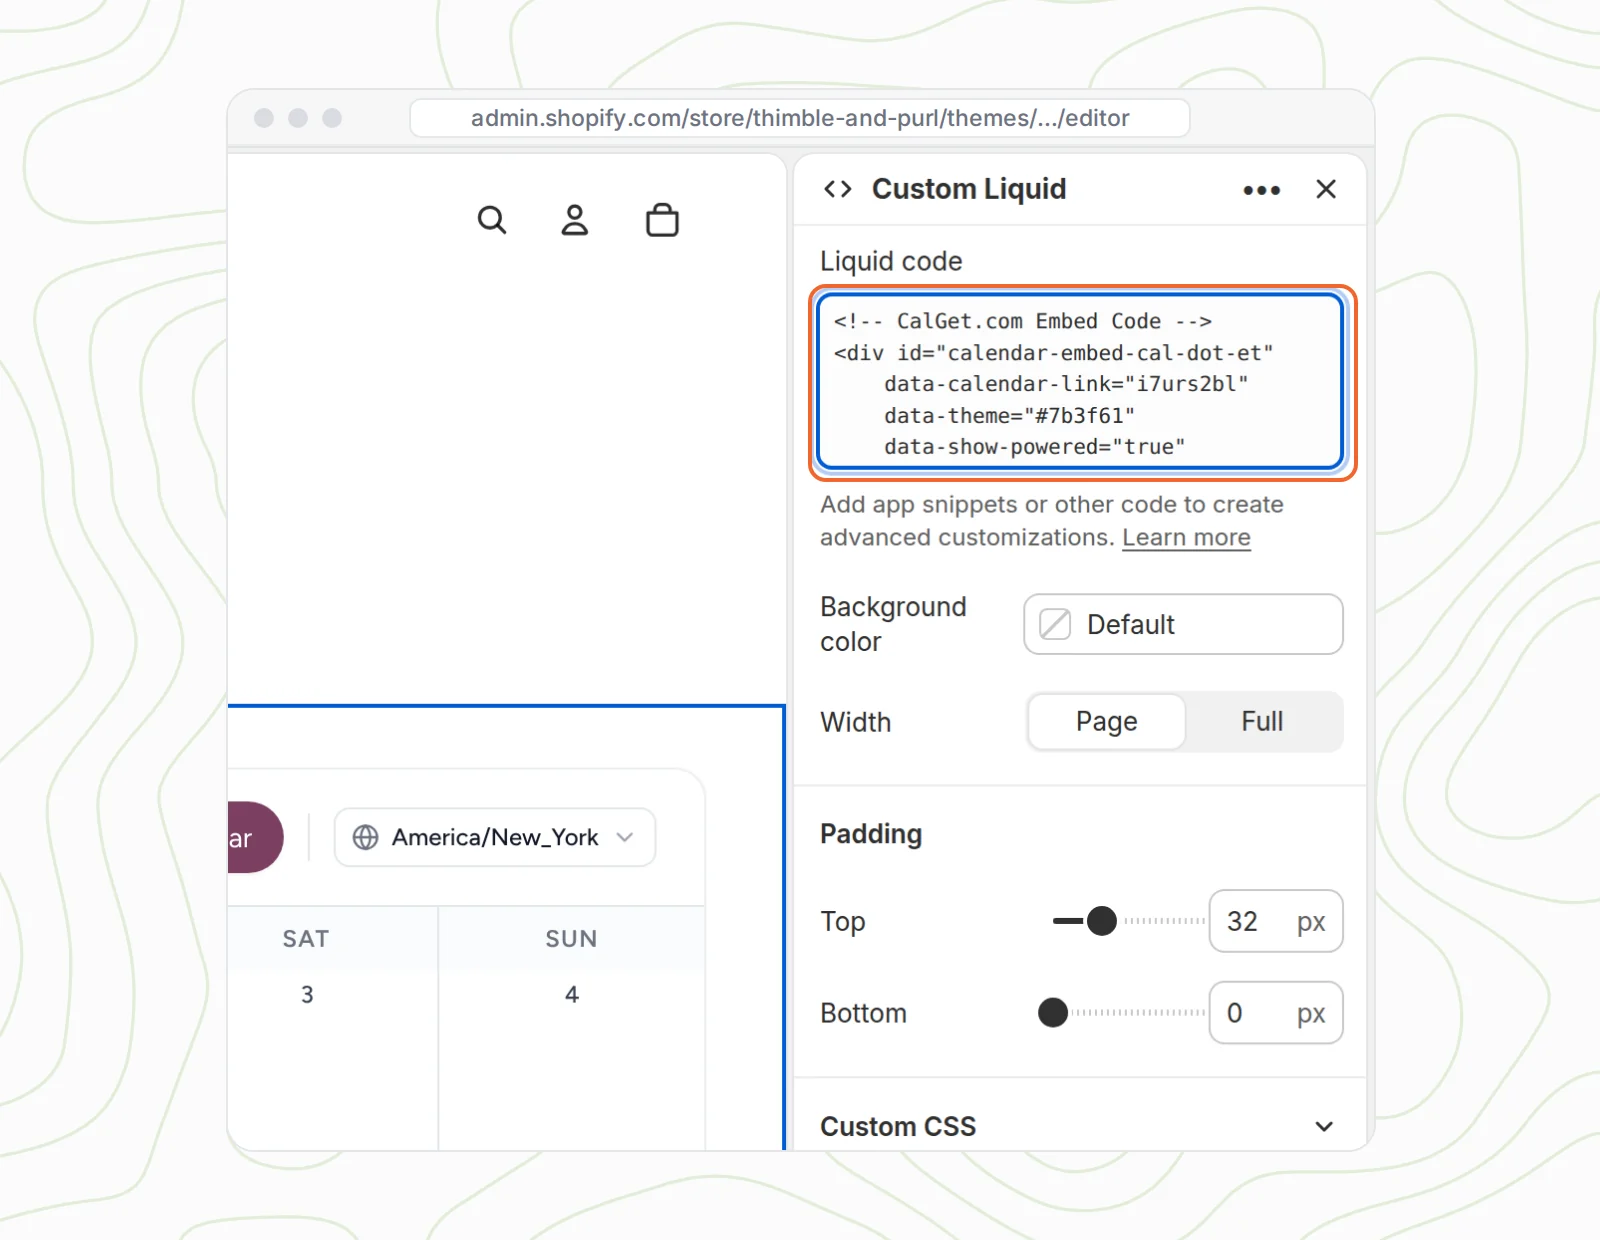
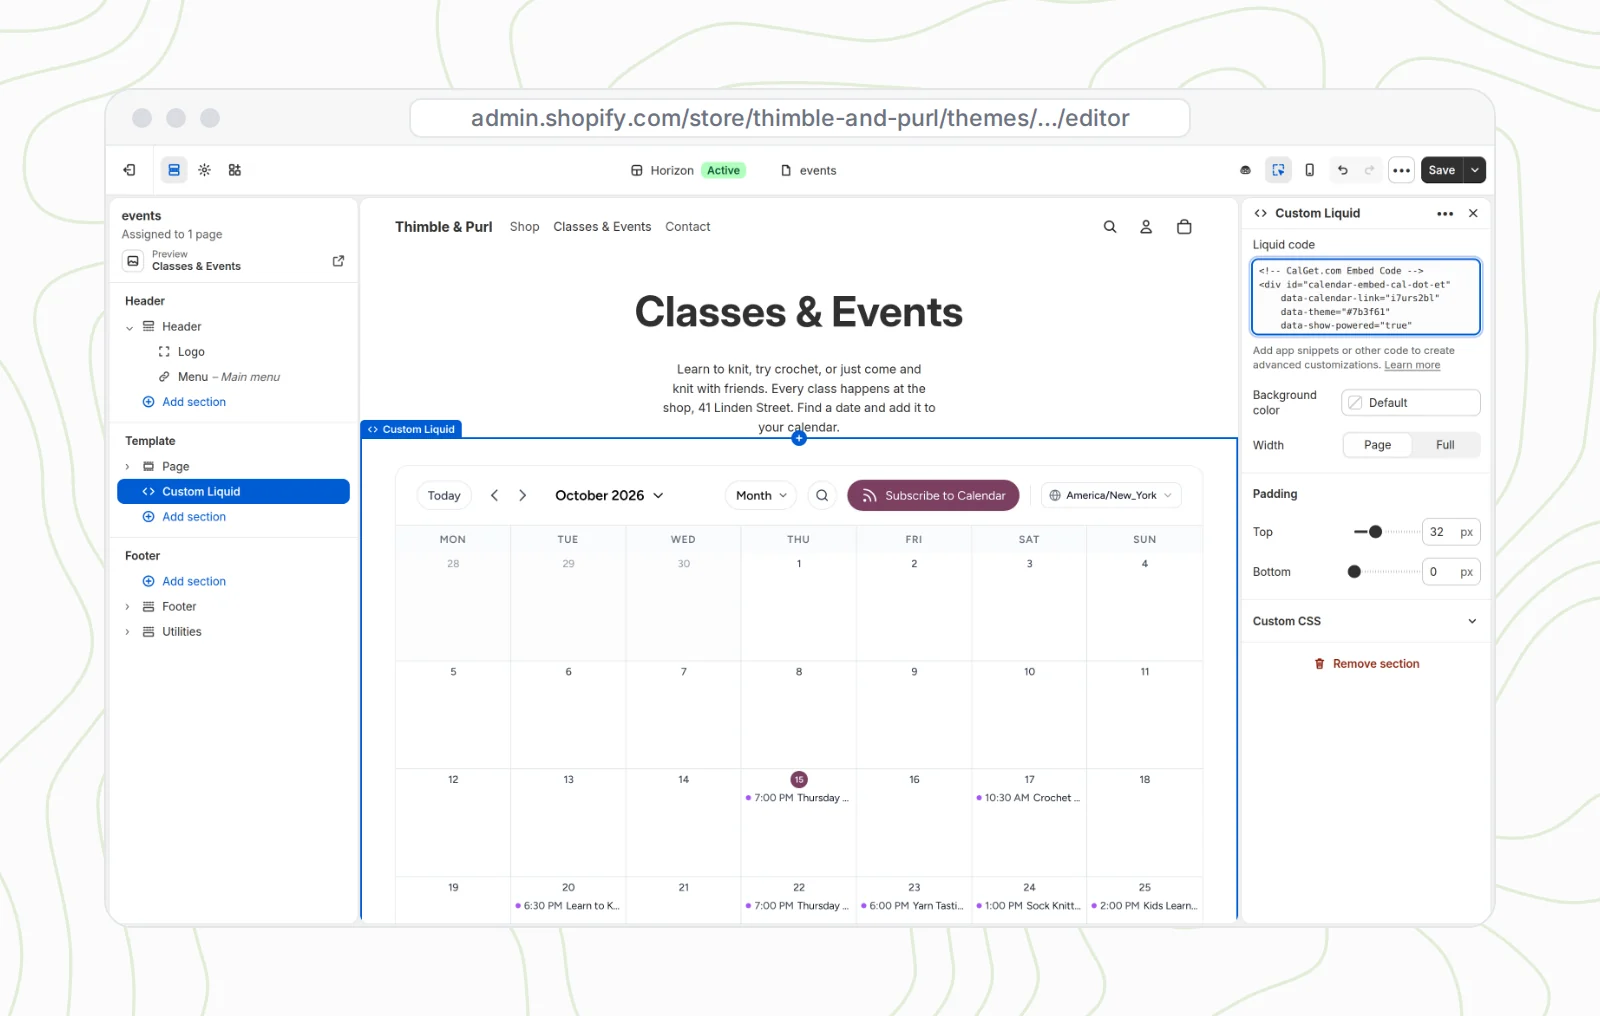
Click into the Liquid code box and paste the code you copied in Step 5. Your calendar appears in the preview, with your events and your colors.
If the calendar sits too close to the text above it, use the Padding slider in the same panel. We set the top padding to 32 px.
Step 11: Save
Click Save at the top right. That's it. Your events calendar is live on your store.
What your customers see
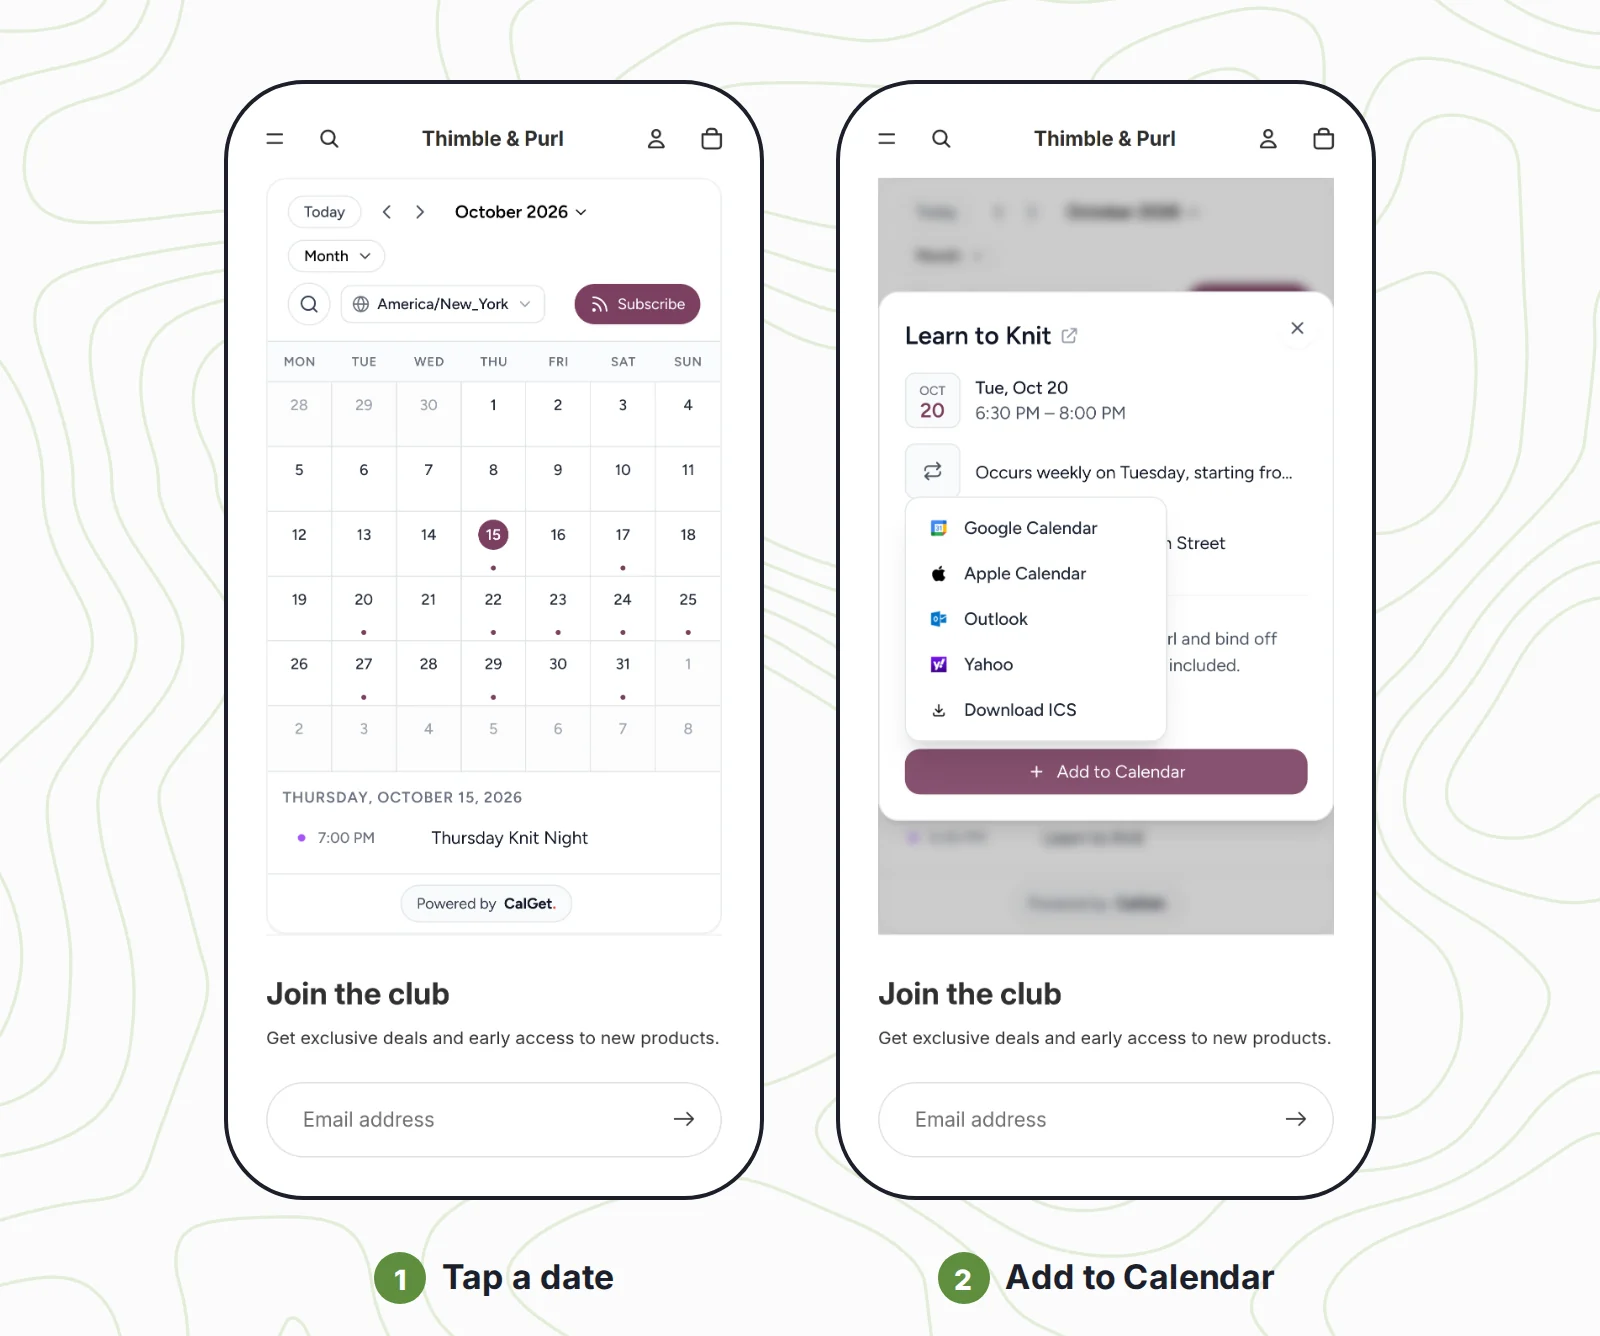
Customers can switch between month, week, schedule and card views, flip through the months, and search for a class. Click any event and they get the time, the place and your description. One more click on Add to Calendar saves it to Google Calendar, Apple Calendar, Outlook or Yahoo, or downloads an ICS file.
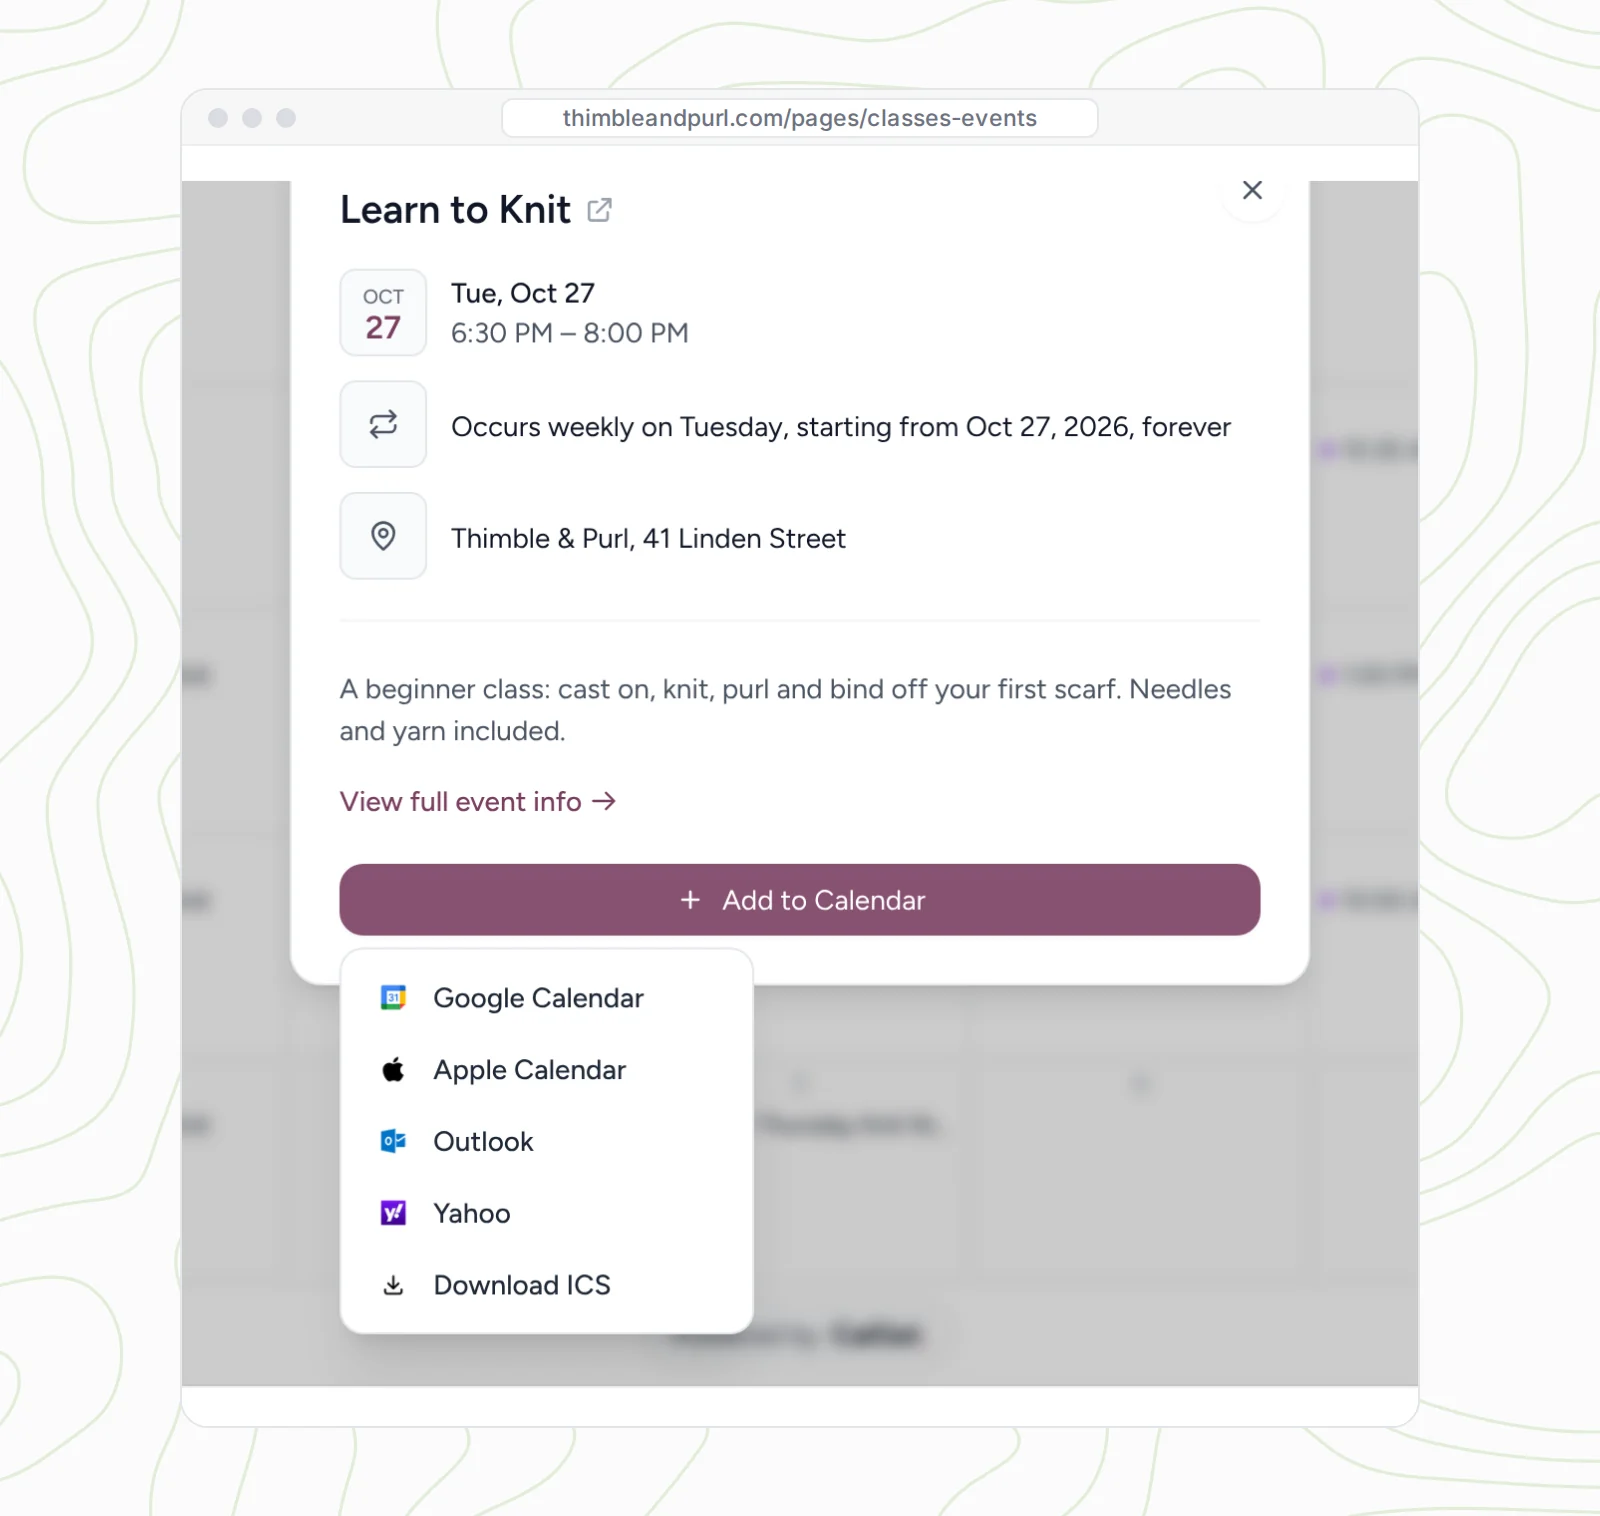
That last step does more for attendance than it looks. Someone who saves your workshop to their own calendar gets their own reminder before it starts. A list of dates on a page can't do that.
Regulars can also click Subscribe to Calendar to follow your whole calendar in Google Calendar, Apple Calendar, Outlook or Office 365. From then on, every new class shows up in their calendar by itself.
And on a phone, the calendar switches to a compact layout: dots under the dates that have events, and the day's events listed underneath. Easy to tap, easy to read.
Adding new events later (no Shopify changes)
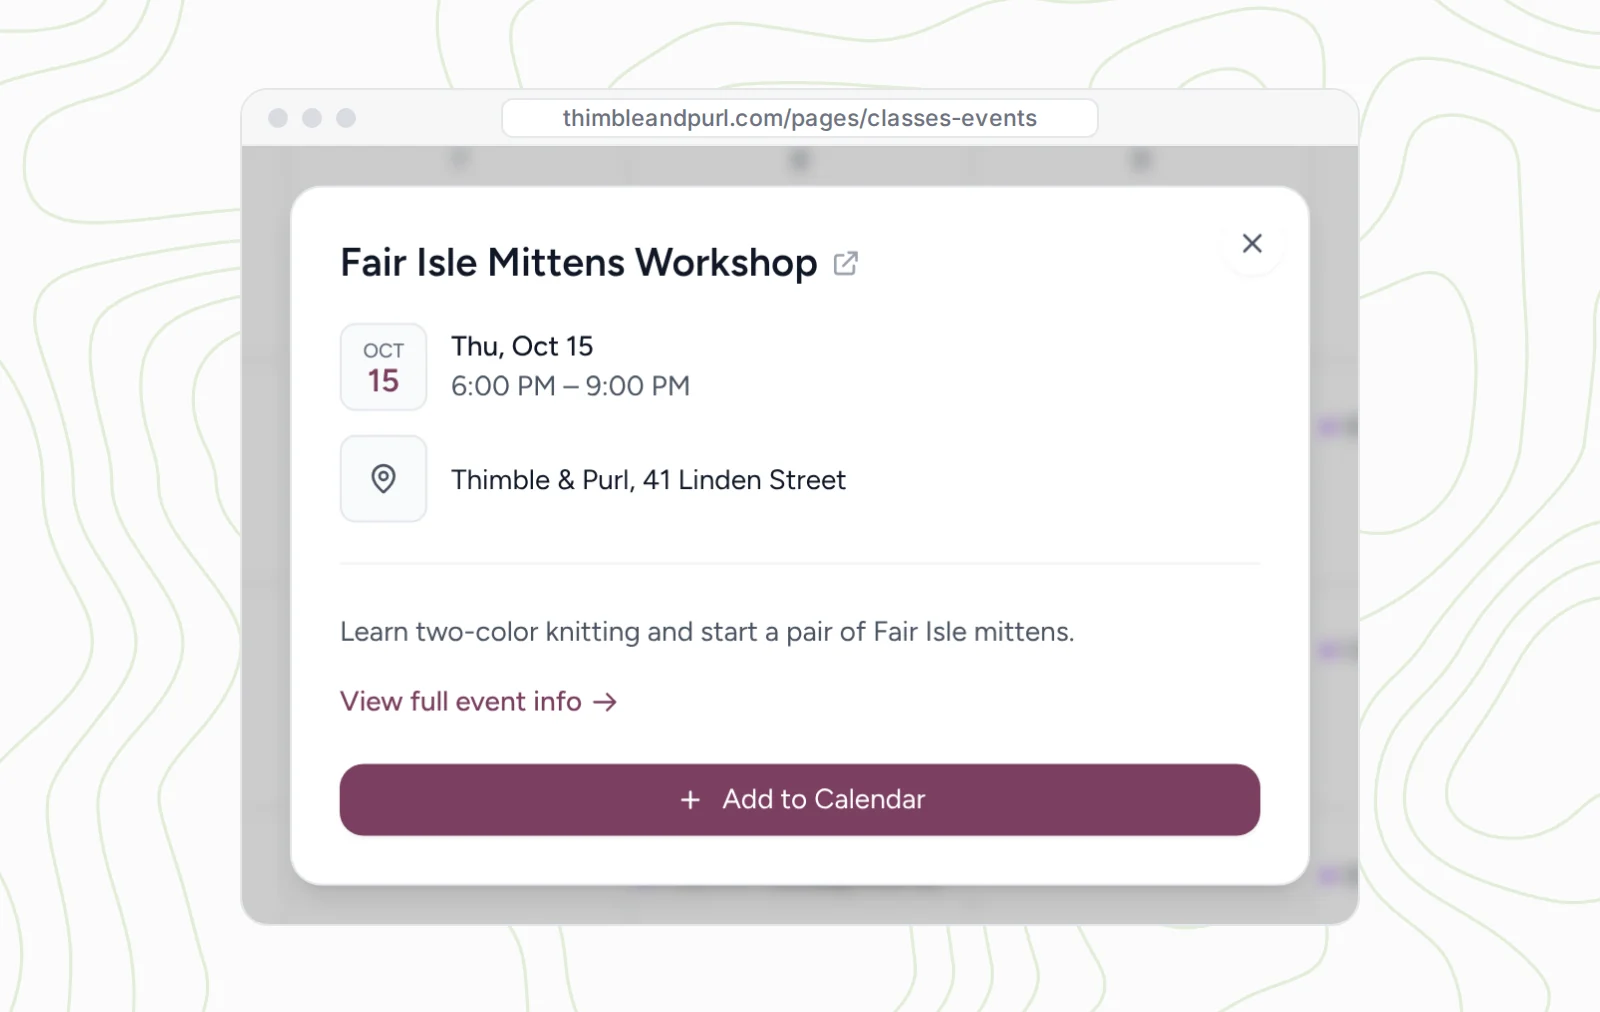
This is where an embedded calendar beats a page you update by hand. The calendar on your store loads your events from CalGet each time someone opens the page. So when you add, move or cancel an event in CalGet, your store shows the change on its own. You don't open Shopify at all.
We tested it. After the page went live, we added a Fair Isle Mittens Workshop in CalGet and reloaded the store. It was already there.
Troubleshooting
The calendar doesn't show up on my store
Check Step 4 first. The domain you allowed in CalGet has to match the address in your browser exactly, including the www (or no www). If your store also opens on another domain, add that one too. Then reload the page.
It shows in the theme editor but not on the live store (or the other way around)
Make sure both addresses are allowed: your store's own domain and your myshopify.com address. Also check that you clicked Save in the theme editor.
The theme editor preview is blank where the calendar should be
Click Save, then reload the theme editor. If it's still blank, check that your myshopify.com address is in your allowed domains (Step 4). The live store is what customers see, so check it there too.
The calendar appears on other pages too
You added the Custom Liquid section to the Default page template. Open that template, select the Custom Liquid section and click Remove section. Then add it to your events template instead, as in Step 9.
Customers see "page not found"
Your page is probably still Hidden. Open it under Online Store → Pages, set Visibility to Visible and save. While you're there, add the page to your store's main menu so customers can find it.
I can't find Custom Liquid or Create template
Both come with Online Store 2.0 themes, which most stores use today. Shopify notes that you can only create new templates with a compatible theme. If yours is an older theme, it may be worth switching to Horizon or Dawn.
It looks cramped
Give the section more width in its settings (Width: Full), or switch the calendar to Schedule view in CalGet, which reads well in a narrower space.
How we tested this
In October 2026 we created a real CalGet calendar for a made-up yarn shop, Thimble & Purl, with weekly classes and one-off workshops. We styled it, allowed the store's domains, copied the JS embed code and pasted it into a Custom Liquid section on a Horizon store page. The Shopify screens in this guide come from our video walkthrough and match the current Shopify admin and theme editor. The calendar running inside them is the real CalGet embed. After the page went live, we added a new workshop in CalGet to confirm the store updates without any Shopify changes.
Frequently asked questions
Can I add an events calendar to Shopify without an app?
Yes. Online Store 2.0 themes include a Custom Liquid section that accepts embed code. Paste a calendar embed code into it, like the one CalGet gives you, and the calendar appears on your page. No app to install.
Does this work with the Dawn theme?
Yes. Dawn, Horizon and other Online Store 2.0 themes all have the Custom Liquid section and support page templates, so the steps are the same.
Do I need to know how to code?
No. You copy one embed code from CalGet and paste it into a box in Shopify's theme editor. You never edit your theme's files.
Will the calendar update when I add new events?
Yes. The calendar loads your events from CalGet every time the page opens, so new, changed or canceled events show up on your store automatically.
Can customers add my events to their own calendar?
Yes. Every event has an Add to Calendar button for Google Calendar, Apple Calendar, Outlook and Yahoo, plus an ICS download. Customers can also subscribe to your whole calendar.
Can I show my Google Calendar on Shopify?
Yes. Sync your Google calendar into CalGet, then follow the same steps. Your events stay in Google Calendar, and your store shows them in a calendar that matches your brand and fits phones.
Put your events where your customers already shop
Set up your events once, paste one code into Shopify, and your store keeps up from there. Building on another platform too? The same calendar works on Squarespace, Wix, WordPress and even Canva websites.
Create your embeddable calendar in CalGet and add it to your Shopify store today.
Written by the CalGet team. We build the calendar tools that store owners and organizers use to get their events onto their websites and into their customers' calendars, and we tested every step in this guide ourselves.
Get Your Events on Everyone's Calendar.
Generate universal "Add to Calendar" links that work everywhere. Perfect for social media, emails, and websites.


Written by
Yared